
Is your turn signal light not working? Fixing it is simpler than you think.
Turn signals are essential for safe driving. A faulty turn signal can lead to accidents and fines. In this guide, you will learn how to fix your turn signal light step-by-step. Whether it’s a burnt-out bulb, a blown fuse, or a wiring issue, you can handle it with basic tools and some patience.
Understanding the problem is the first step to fixing it. Let’s dive into the details, so you can get back on the road safely and confidently.
Introduction To Turn Signal Lights
Turn signal lights are essential parts of your car. They ensure safe driving. They communicate your intentions to other drivers. Understanding their function can help prevent accidents.
Importance Of Turn Signals
Turn signals are crucial for road safety. They indicate your plans to turn or change lanes. This helps other drivers know what you will do next. Using them correctly can prevent collisions.
- They signal your intentions to turn.
- They help avoid accidents.
- They ensure smooth traffic flow.
Common Issues
Turn signal lights can have problems. Some common issues include:
- Burned out bulbs – The bulb needs replacing.
- Faulty wiring – Wires might be loose or damaged.
- Blown fuses – The fuse needs checking and replacing.
- Bad relay – The relay might be malfunctioning.
Identifying these issues early can save you time and money. It also keeps you safe on the road.
Necessary Tools And Materials
Fixing a turn signal light can seem daunting, but it is quite simple. First, gather all necessary tools and materials. Preparing in advance ensures a smooth repair process. This section will outline the basic tools and replacement bulbs required.
Basic Tools
Start with a few basic tools. You will need a screwdriver. A flathead or a Phillips-head, depending on your car. A socket set can also be useful. Some cars require you to remove bolts. Keep a pair of gloves handy. They protect your hands from dirt and sharp edges. A flashlight is helpful. It provides better visibility in dark areas.
Replacement Bulbs
Check your car’s manual for bulb specifications. Different cars use different types of bulbs. Purchase the correct replacement bulbs. You can find these at auto parts stores. Some stores will even install the bulbs for you. This can be a convenient option. Make sure to buy quality bulbs. They last longer and are more reliable.
Safety Precautions
Fixing your turn signal light is important for road safety. Taking safety precautions is the first step. It keeps you safe and prevents accidents. This section covers all you need to know about staying safe.
Preparing Your Vehicle
Before you start, you need to prepare your vehicle. Here are some steps to follow:
- Park your car on a flat surface.
- Turn off the engine.
- Engage the parking brake.
- Place wheel chocks behind the tires.
These steps make sure your car does not move. It keeps you safe.
Personal Safety Tips
Your personal safety is very important. Follow these tips to stay safe:
- Wear gloves to protect your hands.
- Use safety glasses to shield your eyes.
- Work in a well-lit area.
- Keep a first-aid kit nearby.
Be careful with tools and car parts. Stay safe while you work.
Locating The Turn Signal Bulb
Finding the turn signal bulb might seem tricky. But with some guidance, it becomes easy. You need to know where to look and what to look for. Let’s break it down step-by-step.
Vehicle Manual Reference
Your vehicle manual is your best friend. It contains all the information you need. Look for the section on lights and signals. It will show you where the turn signal bulbs are located. This guide is often specific and very clear.
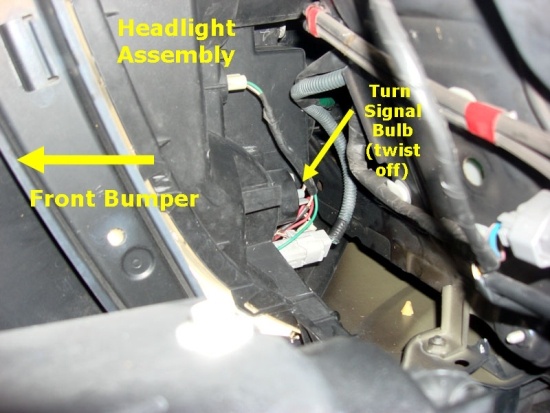
Identifying The Bulb Housing
Once you have the manual, it’s time to locate the bulb housing. The bulb housing is usually at the front and rear of the vehicle. Look for a plastic cover or panel. This cover protects the bulb. It may have screws or clips holding it in place.
Carefully remove these screws or clips. Be gentle to avoid damaging anything. Once open, you will see the bulb inside. Note its position and how it is fixed. This helps when you replace the bulb.
Removing The Old Bulb
Turn signal lights are crucial for safe driving. When a bulb burns out, replacing it quickly is essential. Removing the old bulb is a simple task. Follow these steps to ensure a smooth process.
Accessing The Bulb
First, locate the turn signal housing. Open the hood or trunk to access the back of the light assembly. Usually, you will need a screwdriver to remove any screws holding the cover in place. Once the cover is off, you can see the bulb socket.
Extracting The Bulb
Twist the bulb socket counterclockwise to release it from the housing. Carefully pull the socket out, taking care not to damage any wires. Once the socket is free, gently pull the old bulb out. If the bulb is stuck, wiggle it slightly while pulling.
Dispose of the old bulb properly. Now you are ready to insert the new bulb and complete the repair.
Credit: www.yourmechanic.com
Installing The New Bulb
Replacing a turn signal light is a simple task. Follow these steps to install the new bulb correctly. This ensures your vehicle remains safe on the road.
Choosing The Correct Bulb
Before installing, you need the right bulb. Check your car’s manual for the correct type. You can also ask at an auto parts store. They will guide you.
Here are a few tips for choosing the correct bulb:
- Ensure the wattage matches the original bulb.
- Consider the bulb’s lifespan.
- Choose a reputable brand.
Once you have the correct bulb, you are ready to install it.
Securing The New Bulb
Now, it is time to place the new bulb. Follow these steps:
- Turn off your car and remove the key.
- Open the hood or trunk to access the bulb area.
- Remove the old bulb by turning it counterclockwise.
- Insert the new bulb into the socket.
- Turn it clockwise until it is secure.
After securing the bulb, test it. Turn on your car and activate the turn signal. Ensure it works properly. If not, check the bulb’s connection. Make sure it is tight.
Testing The Turn Signal
Testing the turn signal is an essential step in ensuring your vehicle’s safety. A functioning turn signal alerts other drivers of your intended direction. This can prevent accidents and ensure smooth traffic flow. Let’s explore how to test the turn signal light efficiently.
Checking Functionality
First, sit in the driver’s seat and turn on the ignition. Activate the turn signal by moving the lever up or down. Observe the dashboard indicator light. It should blink in sync with the turn signal.
Next, step out of the vehicle and observe the turn signal light. Make sure it blinks at a regular interval. Check both the front and rear lights. Both should function properly.
Troubleshooting Issues
If the turn signal light doesn’t work, start with the bulbs. Inspect the bulb for any visible damage. Replace it if necessary. Ensure the new bulb matches the required specifications.
If the bulb is fine, check the fuse box. Locate the turn signal fuse and inspect it. Replace any blown fuses with one of the same rating. This is a common fix.
If the fuse is intact, test the turn signal relay. Listen for a clicking sound when the turn signal is on. If you don’t hear it, the relay might be faulty. Replace the relay if needed.
Lastly, inspect the wiring and connections. Look for any loose or damaged wires. Secure any loose connections and repair any damages. This ensures a stable electrical flow.
Final Steps
Now that you have replaced your turn signal light, it’s time to complete the process. These final steps ensure your turn signal functions properly and your vehicle is road-ready. Follow these steps carefully to finish the job.
Reassembling Components
First, reattach the light cover or housing to the vehicle. Ensure it fits snugly and is properly aligned. Use the screws or clips you set aside earlier. Tighten them firmly, but do not over-tighten. Over-tightening can crack the cover.
Next, reconnect the wiring harness if you disconnected it. Double-check all connections to make sure they are secure. Loose connections can cause the light to malfunction. Once everything is connected, test the turn signal to ensure it works.
Cleaning Up
Remove any tools or materials from the work area. Check for any loose parts or debris that may have fallen during the repair. Clean the area around the turn signal light. This ensures there are no obstructions that could affect its performance.
Finally, dispose of the old bulb properly. Many auto parts stores accept used bulbs for recycling. Keeping your workspace clean helps prevent future issues and keeps your vehicle in top condition.
Maintenance Tips
Maintaining your turn signal light is crucial for road safety. Regular maintenance ensures that your signals work correctly. This section provides practical tips to keep your turn signals in top condition.
Regular Inspections
Check your turn signal lights often. Make it a habit before long drives. Inspect both front and back signals. Ensure they flash at the right speed. A quick blink may indicate a problem.
Test the signals during the day and night. Different light conditions help spot issues. If one side blinks faster, it means a bulb might be out. A slow blink can signal a wiring issue. Regular inspections catch these problems early.
Signs Of Future Problems
Pay attention to any irregular blinking. If the signal clicks faster, the bulb might burn out soon. Dimming lights can signal a weak battery or poor connection. Listen for any strange noises. Unusual clicks may mean a relay issue.
Check for moisture inside the signal lens. Water can cause electrical problems. Look for any cracks or damage to the lens. Even small cracks can let moisture in. Noticing these signs early helps prevent bigger issues.

Credit: m.youtube.com
Credit: www.carbuyingtips.com
Frequently Asked Questions
How Do I Know My Turn Signal Is Bad?
If your turn signal blinks rapidly or not at all, it’s likely faulty. Check for burnt-out bulbs or electrical issues.
Can I Fix The Turn Signal Myself?
Yes, you can fix it yourself. Replace the bulb or check the fuse. Refer to your car’s manual for guidance.
What Tools Do I Need To Fix A Turn Signal?
Common tools include a screwdriver, replacement bulbs, and possibly a fuse puller. Always refer to your car’s manual.
How Much Does It Cost To Fix A Turn Signal?
Costs vary, but DIY repairs usually cost under $20. Professional repairs may range from $50 to $150.
Conclusion
Fixing a turn signal light is simple and vital for safety. Follow the steps outlined above to keep your vehicle in good condition. Regular checks help avoid issues on the road. Always have the necessary tools handy. A functioning turn signal light ensures you communicate effectively with other drivers.
Stay safe and maintain your car regularly. Happy driving!


