
Fixing a pull chain light is simple. You can do it yourself.
This guide will help you with that. Pull chain lights are common in homes. They are easy to use but can break over time. Instead of calling an electrician, try fixing it yourself. It can save you time and money.
This post will explain the steps. You will learn how to identify the problem and replace the pull chain. Follow these steps to get your light working again. By the end, you will be confident in fixing pull chain lights on your own. Let’s get started!

Credit: www.ifixit.com
Introduction To Pull Chain Lights
Pull chain lights are a common feature in many homes. They are simple and practical. These lights are usually found in closets, basements, and garages. With a pull of the chain, you can easily turn the light on or off. It’s a straightforward mechanism that anyone can use.
These lights are popular due to their ease of use and reliability. But like any other device, pull chain lights can sometimes face issues. Understanding these problems can help you fix them yourself. This guide will walk you through common issues and the benefits of DIY repair.
Common Issues
Pull chain lights can have a few common problems. Here are some of them:
- The chain gets stuck or breaks
- The light doesn’t turn on
- The light flickers
The chain getting stuck or breaking is a frequent issue. This can happen due to wear and tear. The light not turning on could be due to a faulty connection or a burnt-out bulb. Flickering lights can indicate a loose connection or an issue with the bulb.
Benefits Of Diy Repair
Fixing a pull chain light yourself has several advantages:
- You save money on professional repairs
- You gain valuable DIY skills
- You fix the problem quickly, without waiting
Saving money is a big benefit. DIY skills are useful for many home repairs. Fixing problems quickly means you can enjoy your light again without delay.
Here’s a simple table that summarizes these benefits:
| Benefits | Details |
|---|---|
| Save Money | Avoid paying for professional repairs |
| DIY Skills | Learn and apply new skills |
| Quick Fix | Resolve the issue without waiting |
In summary, understanding pull chain lights and their common issues can empower you to fix them yourself. Enjoy the benefits of DIY repair and keep your lights working smoothly.
Tools And Materials Needed
Fixing a pull chain light can seem daunting. But having the right tools and materials makes the task easier. In this section, we’ll outline the essential tools and recommended materials you’ll need.
Essential Tools
First, gather your tools. You’ll need a pair of pliers. Pliers help with gripping and pulling. Screwdrivers are another must-have. Both flathead and Phillips types are useful. A wire stripper is also necessary. This tool helps you strip the insulation from wires. Don’t forget a voltage tester. This tool ensures safety by checking for live wires.
Recommended Materials
Next, let’s talk materials. You’ll need a replacement pull chain switch. Make sure it matches your light fixture. Electrical tape is crucial for securing wire connections. Wire nuts are also important. They help join wires safely. If your fixture uses bulbs, have a few spare ones. Sometimes, bulbs burn out during repairs. Lastly, keep some spare wire handy. This is useful in case the existing wire is too short.
Safety Precautions
Fixing a pull chain light involves dealing with electrical components. Safety precautions are essential to prevent accidents. Follow these steps to ensure your safety while repairing your light fixture.
Turning Off Power
Always turn off the power at the circuit breaker. This step prevents electric shocks. Ensure the room light is off before starting. Check the light switch as an extra precaution. Use a voltage tester to confirm no power is flowing.
Using Safety Gear
Wear safety gear to protect yourself. Use insulated gloves to avoid electrical contact. Safety glasses shield your eyes from debris. A sturdy ladder provides stable support. Non-slip shoes help maintain balance. These measures reduce the risk of accidents.
Identifying The Problem
Identifying the problem with your pull chain light is the first step to fixing it. This process involves checking different components of the light fixture. Knowing what to look for can save you time and effort. Let’s explore the common issues: a broken chain and a faulty switch.
Broken Chain
A broken chain is a common issue. It stops you from turning the light on or off. Inspect the chain closely. Look for any breaks or weak links. If the chain is broken, you might need to replace it. Sometimes, the chain may just be stuck. Gently pull on it to see if it moves freely. If it doesn’t, the chain could be jammed inside the switch.
Faulty Switch
The switch inside the fixture might be faulty. It can wear out over time. Signs of a faulty switch include flickering lights or no response when you pull the chain. To check the switch, you will need to remove the light fixture cover. Once open, inspect the switch for any obvious damage. If you see burnt marks or loose wires, the switch likely needs replacing.
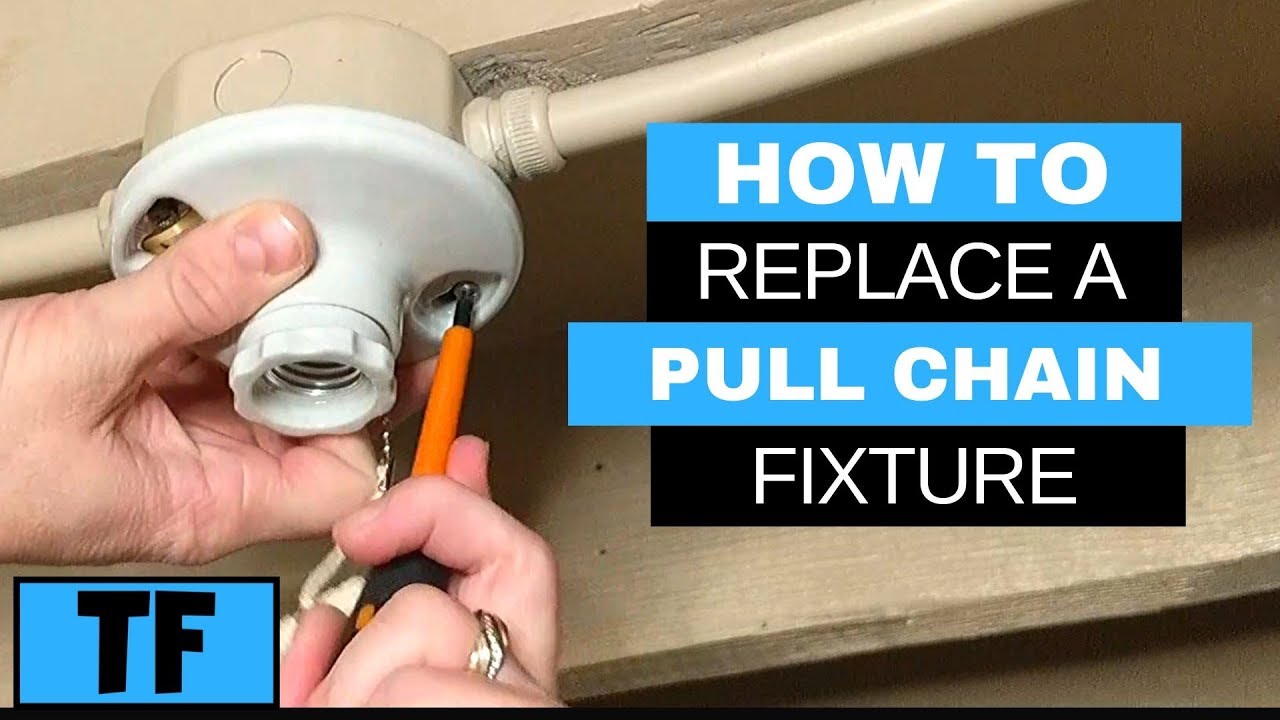
Removing The Light Fixture
Removing the light fixture is a key step in fixing a pull chain light. This process might seem daunting, but with the right tools and guidance, it’s quite straightforward. Let’s break it down into manageable steps.
Unscrewing The Fixture
First, gather your tools. You will need a screwdriver. Begin by locating the screws that hold the fixture in place. These are usually on the sides or the bottom of the fixture. Use the screwdriver to remove these screws carefully.
- Locate screws on the fixture.
- Use a screwdriver to remove them.
Once the screws are out, gently lower the fixture. Be cautious, as wires will still be attached. Hold the fixture steady to avoid pulling on the wires.
Disconnecting Wires
Next, you need to disconnect the wires. Before doing this, ensure the power is off. Use a voltage tester to double-check there is no electricity running to the fixture. Once confirmed, proceed with disconnecting the wires.
- Turn off the power at the circuit breaker.
- Use a voltage tester for safety.
- Disconnect the wires from the fixture.
Usually, you will see two or three wires: a black (live), a white (neutral), and sometimes a green (ground) wire. Unscrew the wire nuts and gently pull the wires apart. Remember how they were connected for reassembly later.
By following these steps, you can safely and effectively remove the light fixture, making it easier to fix the pull chain light.
Replacing The Pull Chain
Is your pull chain light not working? The solution is often simple: replace the pull chain. This task is easy and requires just a few tools. Follow these steps to fix your light in no time.
Detaching The Old Chain
First, turn off the power to the light fixture. This step is crucial to ensure safety. Use a tester to confirm the power is off.
Next, remove the light bulb and the fixture cover. Most covers can be unscrewed by hand. If it’s stuck, use a screwdriver carefully.
Now, locate the broken pull chain inside. You will see it connected to a switch. Use pliers to unscrew the nut holding the chain in place.
Once the nut is off, carefully detach the old chain from the switch. Keep the nut and other small parts in a safe place.
Attaching The New Chain
Take your new pull chain. Insert it through the hole where the old chain was. Secure it by screwing the nut back on. Use pliers to tighten it if necessary.
Now, connect the new chain to the switch. Ensure it is attached firmly. Check if the chain pulls smoothly and activates the switch.
Replace the fixture cover and the light bulb. Turn the power back on. Test the new pull chain. Your light should now work perfectly.
If you encounter any issues, double-check each step. Make sure all connections are secure. Your pull chain light should now function as new.
Reassembling The Fixture
After fixing or replacing the pull chain light switch, the next step is to reassemble the fixture. Doing this correctly ensures the light works safely and properly. Follow the steps below carefully to get your light fixture back in working order.
Reconnecting Wires
First, identify the wires you disconnected earlier. These are usually black, white, and sometimes green or copper for grounding. Using wire nuts, twist the matching wires back together. Ensure they are secure and there is no exposed wire. Double-check the connections to avoid any electrical issues.
Securing The Fixture
Once the wires are connected, carefully tuck them back into the fixture box. Align the fixture with the screw holes on the ceiling or wall. Use a screwdriver to fasten the screws tightly. Make sure the fixture is stable and does not wobble. Check that the pull chain operates smoothly and the light turns on and off as expected.

Credit: diy.stackexchange.com
Testing The Light
To ensure your pull chain light works correctly, you must test it. This involves a few steps to check its functionality and safety. Follow these instructions carefully to avoid any issues.
Turning On The Power
Before testing the light, turn on the power to the circuit. This is crucial for checking if the light functions properly.
- Locate your home’s circuit breaker box.
- Identify the breaker that controls the light fixture.
- Switch the breaker to the “on” position.
Ensure you do this safely. If unsure, consult a professional electrician.
Checking The Functionality
Now that the power is on, you can check the light’s functionality. This will help you understand if the pull chain mechanism is working correctly.
- Pull the chain to turn the light on.
- If the light does not turn on, pull the chain again.
- Observe any flickering or delays in the light turning on.
If the light does not turn on after several attempts, there may be an issue with the pull chain switch or the bulb itself. In this case, you may need to replace the pull chain switch or the light bulb.
Consider these potential problems:
| Problem | Possible Solution |
|---|---|
| Light does not turn on | Check the bulb or replace the pull chain switch |
| Light flickers | Ensure the bulb is securely fastened |
| Chain gets stuck | Lubricate the chain or replace the switch |
Remember, always handle electrical components with care. If you encounter persistent issues, seek professional help.
Troubleshooting Tips
Having issues with your pull chain light can be frustrating. These lights are handy, but they can also have problems. This section will guide you through some troubleshooting tips. These tips can help you fix your pull chain light yourself.
Persistent Issues
Sometimes, the light does not turn on. This can be due to a faulty bulb. Check if the bulb is loose. Tighten it, but be gentle. If the light still does not work, replace the bulb. A new bulb can often solve the issue.
If the chain is stuck, it may be tangled. Gently pull the chain to untangle it. Be careful not to break it. If the chain is broken, you will need a replacement. Most hardware stores sell pull chain replacements.
Another common problem is a faulty switch. The switch inside the fixture can wear out. If the light flickers, the switch may be the problem. Replacing the switch can fix this issue. Always turn off the power before working on the switch.
When To Call A Professional
Some issues need a professional. If you have tried the tips and the light still does not work, call an electrician. Do not try to fix electrical wiring yourself. It can be dangerous.
If there is a burning smell or smoke, turn off the power immediately. These signs indicate a serious problem. Call a professional to inspect the fixture. Safety is the top priority. Always ensure the power is off before troubleshooting.
Credit: m.youtube.com
Frequently Asked Questions
How Do You Fix A Pull Chain Light?
First, turn off the power. Remove the light fixture cover. Replace the broken chain. Reassemble and test.
Why Is My Pull Chain Light Not Working?
Your pull chain light might not work due to a broken chain, faulty switch, or electrical issue. Inspect all components.
Can You Replace A Pull Chain Switch?
Yes, you can replace a pull chain switch. Turn off the power, remove the fixture, and install a new switch.
What Tools Are Needed To Fix A Pull Chain Light?
You’ll need a screwdriver, wire stripper, replacement pull chain, and a voltage tester for safety. Ensure tools are ready.
Conclusion
Fixing a pull chain light can be simple with the right steps. Follow the guide above to troubleshoot and repair your light. Practice safety by turning off the power first. Gather necessary tools before starting. If you face issues, consider consulting a professional.
Regular maintenance helps prevent future problems. Share your success with others who may need help. Thank you for reading and good luck with your repair!


