
Fixing an LED light strip connector can seem tricky. But it’s easier than you think.
In this guide, we’ll show you how to fix it step by step. LED light strips are popular for adding ambiance to a room. They are flexible, energy-efficient, and come in various colors. However, sometimes the connectors can fail. This can lead to sections of the strip not lighting up.
Before you think about replacing the whole strip, try fixing the connector first. It’s a simple process that doesn’t require special tools. With just a bit of patience, you can get your lights working again in no time. Let’s dive into the solution and bring the glow back to your space!
Tools And Materials Needed
Fixing an LED light strip connector requires the right tools and materials. This ensures the repair process is smooth and successful. Below, you will find a list of essential tools and necessary materials for the task.
Essential Tools
- Screwdriver: A small, flat-head screwdriver will work best.
- Wire Cutter: Use this to cut the LED strip cleanly.
- Wire Stripper: This will help strip the wires to the correct length.
- Soldering Iron: A soldering iron is needed for secure connections.
- Multimeter: Check for continuity and proper voltage.
- Heat Gun: Use a heat gun for shrinking heat shrink tubes.
Necessary Materials
- Replacement Connectors: Ensure they match the LED strip type.
- Heat Shrink Tubes: Protects the connections from damage.
- Electrical Tape: Use this to secure connections.
- Rosin Core Solder: Needed for soldering the wires.
- Extra Wires: Have some extra wires handy for any extensions.
- LED Strip: Ensure you have the correct type of LED strip.

Credit: hitlights.com
Safety Precautions
Safety is crucial when working with LED light strips. Before fixing a connector, take necessary precautions. These steps ensure your safety and prevent damage to your LED strips.
Handling Led Strips
Always handle LED strips with clean, dry hands. Dirt or moisture can cause short circuits. Avoid bending the strips sharply. This can damage the internal wiring. Use gentle pressure when attaching connectors. Excessive force may break delicate components. Keep the working area well-lit. Proper visibility reduces the risk of errors.
Electrical Safety Tips
Turn off the power source before starting any work. This prevents accidental shocks. Use insulated tools to avoid electrical contact. Check all connections twice. Loose connections can cause overheating. Ensure your workspace is dry. Water and electricity don’t mix. Be aware of your surroundings. Avoid working near flammable materials.
Identifying The Problem
Before fixing your LED light strip connector, you need to identify the problem. Knowing the root cause helps you apply the right solution. In this section, we will focus on common issues and how to inspect your LED light strip visually.
Common Issues
Several problems can occur with LED light strip connectors. Here are some of the most common:
- Loose connections: The connector is not securely attached.
- Bent pins: The pins inside the connector may be bent or broken.
- Corrosion: Dirt or moisture can cause corrosion.
- Burnt connectors: Overheating can burn the connector or the strip.
Visual Inspection
A visual inspection is the first step in identifying problems with your LED light strip connector. Follow these steps:
- Turn off the power to your LED light strip.
- Carefully disconnect the connector from the strip.
- Inspect the connector pins for any signs of damage or bending.
- Check for any corrosion or dirt on the connector.
- Look for burn marks on the connector and the strip.
Use a magnifying glass if needed to see small details. If you find any issues during your inspection, you can then proceed to fix the problem.
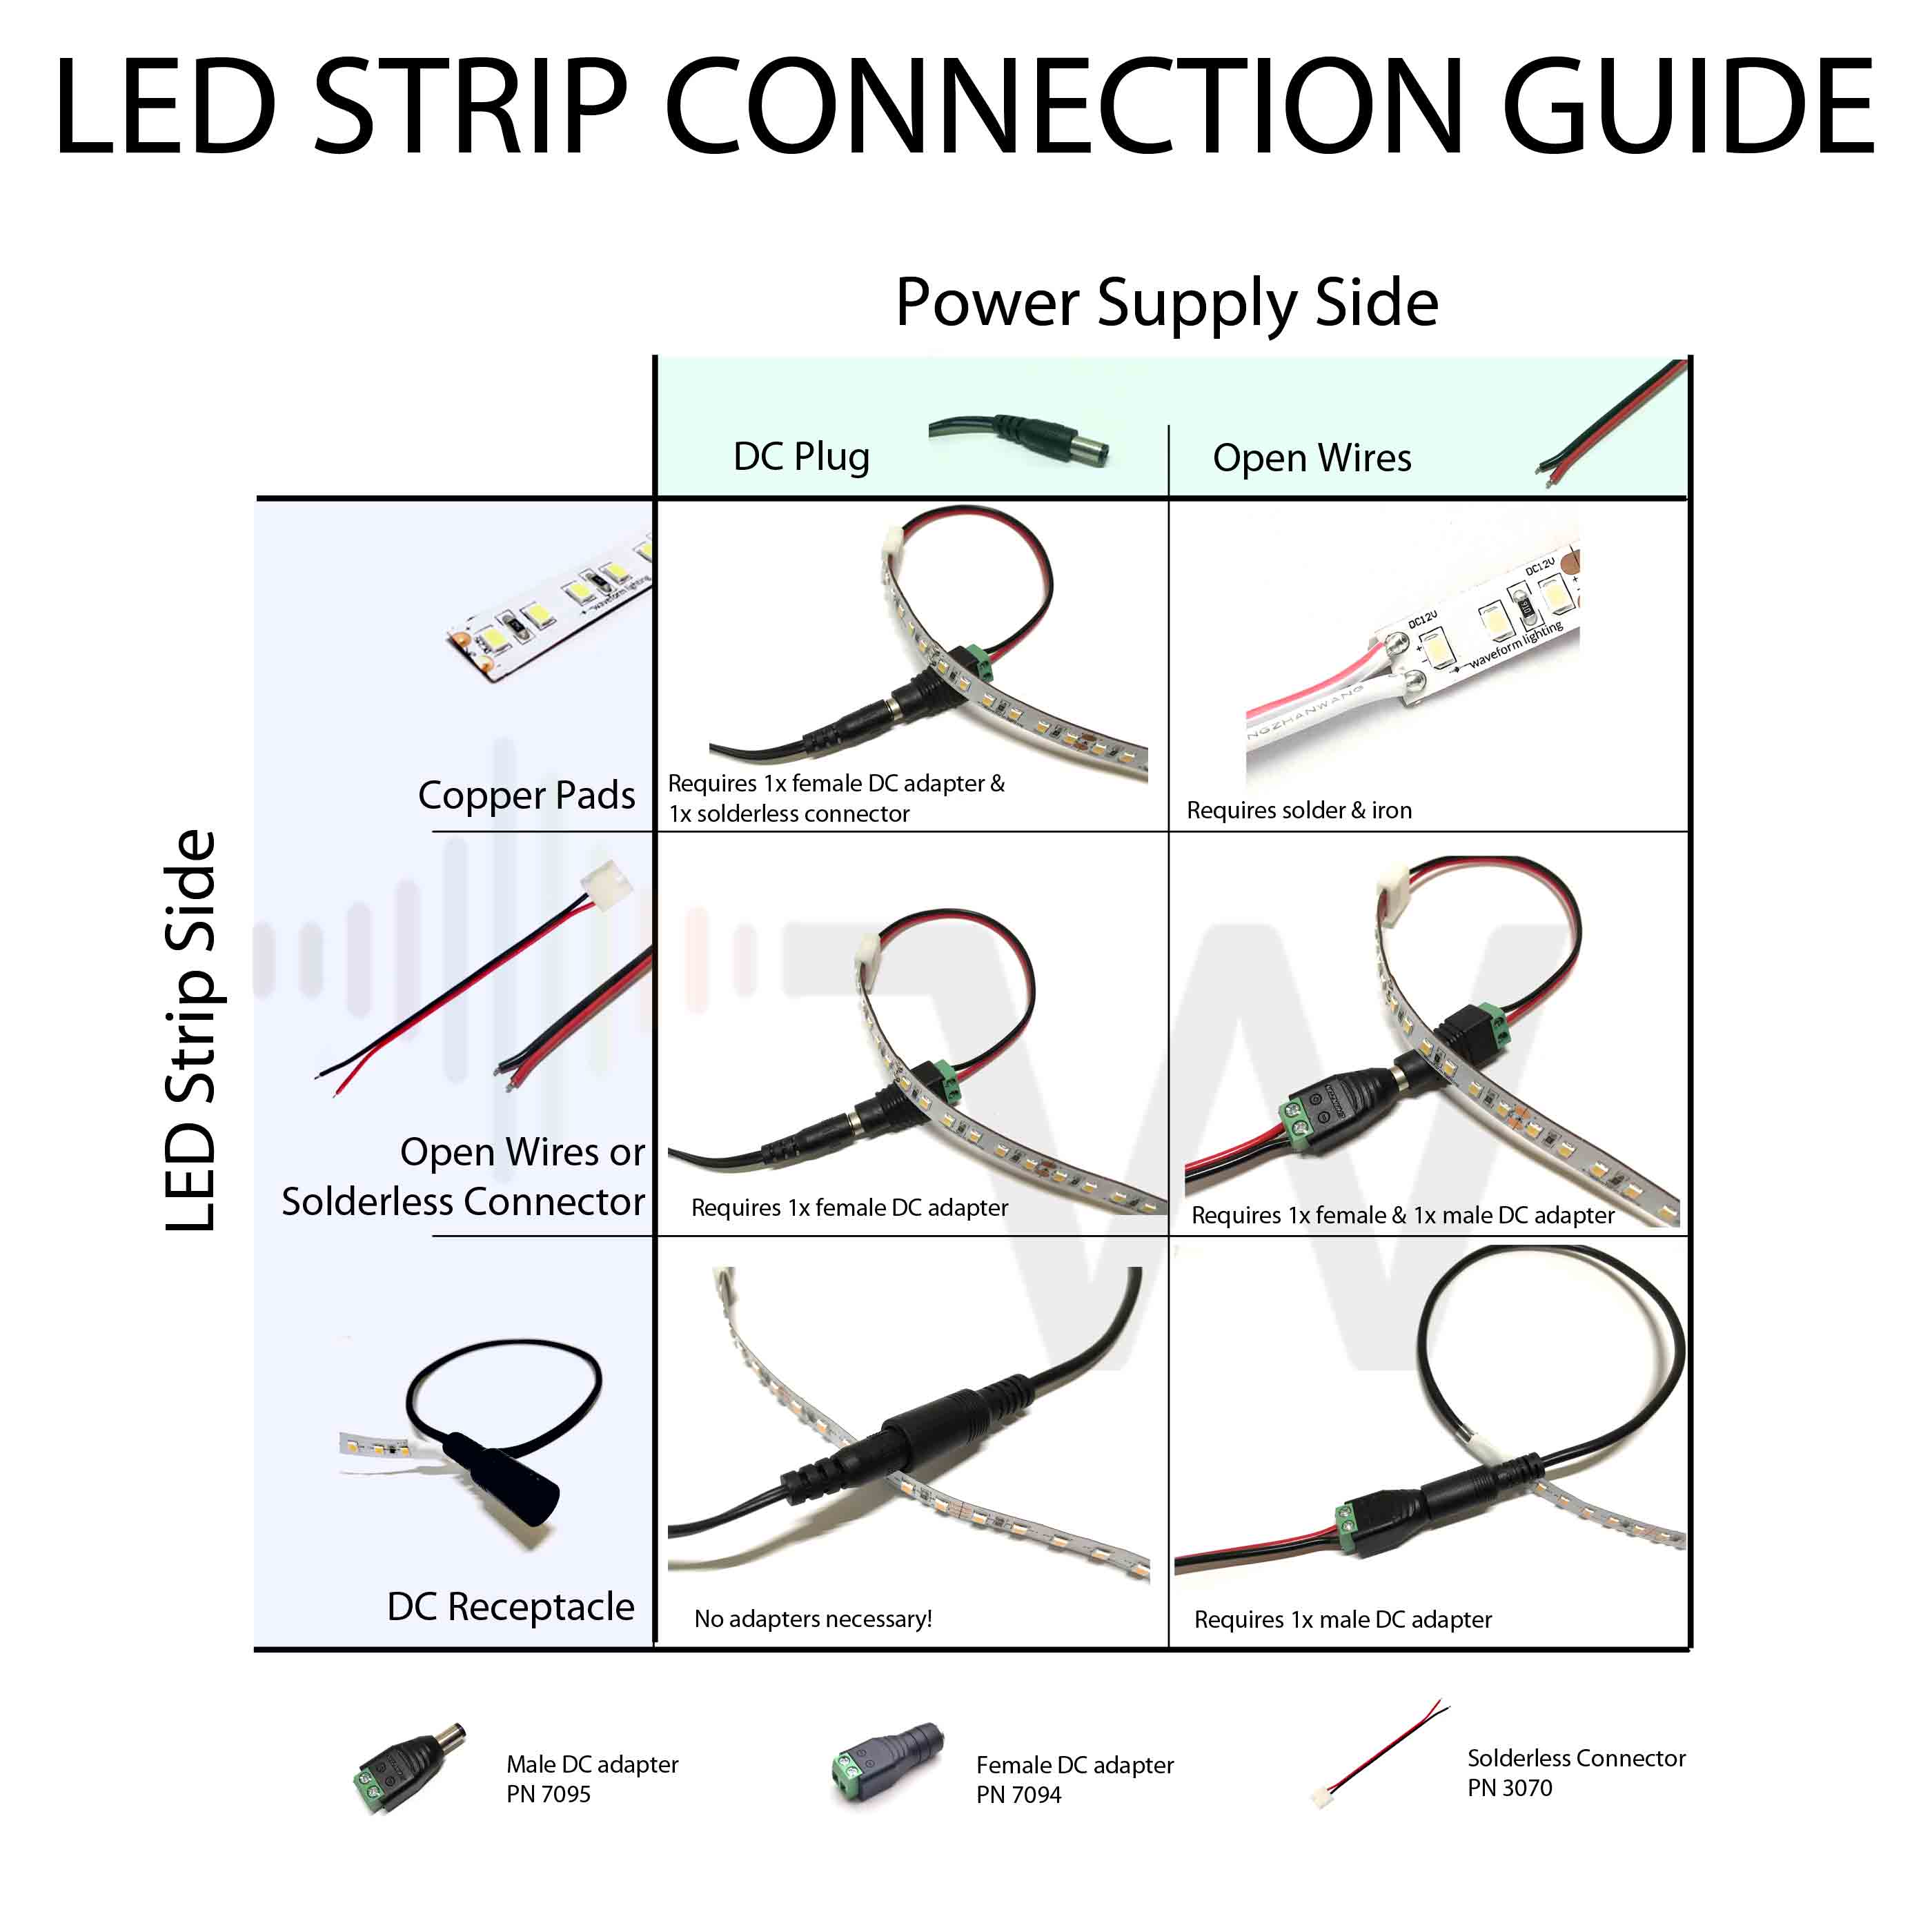
Credit: www.waveformlighting.com
Preparing The Led Strips
Before fixing your LED light strip connector, you need to prepare the LED strips. Proper preparation ensures a secure and long-lasting connection. Follow these steps to get your LED strips ready for the repair.
Cleaning The Strips
First, clean the LED strips. Dirt and dust can prevent a good connection. Use a soft, dry cloth to wipe the strips. Make sure they are free from any debris.
For stubborn dirt, use a slightly damp cloth. Avoid using too much water. Water can damage the LED strips.
Cutting The Strips
Next, cut the LED strips to the desired length. Use sharp scissors or a utility knife. Cut only at the marked lines. These lines show where the strips can be safely cut.
After cutting, check the exposed ends. Make sure there are no frayed edges. Clean cuts ensure better connections.
Connecting The Led Strips
Connecting LED light strips can seem hard. But with the right steps, it becomes easy. Here’s a guide to help you connect your LED strips.
Aligning The Connectors
First, check the connectors. Ensure the pins match. The connectors have small pins. These pins must align with the strip’s copper pads. Double-check the alignment before proceeding. Misalignment can cause the lights not to work.
Securing The Connection
Once aligned, push the connectors gently. Ensure they fit snugly. Loose connections can cause flickering lights. After connecting, give the strip a slight tug. It should stay in place. If it moves, the connection isn’t secure. Try again until it fits well.
Testing The Connection
After fixing your LED light strip connector, testing the connection is crucial. This step ensures everything works as expected. It helps identify any remaining issues. Follow these easy steps to test your connection.
Powering On
First, plug in your LED light strip. Ensure the power source is functional. Turn on the power switch. Observe the lights. Do they power on without flickering? If not, check the power supply.
Checking For Proper Function
After powering on, inspect the LED strip closely. Look for consistent brightness. Move along the strip to spot any dim sections. Check if all colors work correctly. Test different modes if available. Confirm the lights respond to remote control commands.
Troubleshooting Tips
Having trouble with your LED light strip connector? Don’t worry. Here are some troubleshooting tips to help you fix common issues. Let’s dive into the details and get your LED light strip working again.
Connection Issues
Check if the connectors are properly aligned. Misalignment can cause connectivity problems. Make sure the pins match up with the LED strip’s contacts. Sometimes, the connectors may not be fully inserted. Push them gently but firmly. Also, inspect the connectors for dust or debris. Clean them using a soft brush or cloth. This can improve the connection quality.
Led Strip Not Lighting
If your LED strip is not lighting up, verify the power source. Ensure it is plugged in and switched on. Check the voltage compatibility between the power source and the LED strip. Mismatched voltage can prevent the strip from lighting. Inspect the LED strip for any visible damage. Broken or bent strips can disrupt the circuit. If none of these steps work, test with another power adapter. The issue might be with the adapter itself.
Maintaining Your Led Strips
Maintaining your LED strips ensures they last longer and shine brighter. Proper care helps avoid issues and ensures the lights work well. Below are some tips on how to keep your LED strips in top shape.
Regular Inspections
Regular inspections are crucial for LED strip longevity. Check your LED strips at least once a month. Look for any signs of wear or damage. Ensure all connectors are secure. Loose connections can cause the LEDs to flicker or not work.
Inspect the power source. Make sure it is working correctly. Faulty power sources can damage your LED strips. If any part looks worn or broken, replace it immediately.
Cleaning Tips
Dust and dirt can reduce LED strip brightness. Regular cleaning keeps them shining bright. Use a soft, dry cloth to wipe the strips. Avoid using water or any liquid cleaners. Liquids can damage the LED components.
For stubborn dirt, use a slightly damp cloth. Make sure to unplug the LED strips first. Gently wipe the strips and connectors. Allow them to dry completely before plugging them back in.
If your LED strips are in a high-dust area, consider using a protective cover. This reduces the need for frequent cleaning.
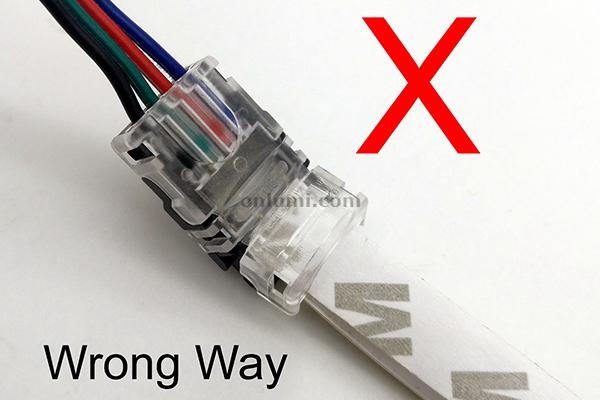
Credit: www.onlumi.com
Frequently Asked Questions
How To Identify A Faulty Led Light Strip Connector?
To identify a faulty LED light strip connector, check for loose connections, burnt marks, or any visible damage. If the lights flicker or do not turn on, the connector might be the issue.
Can I Fix Led Light Strip Connector Myself?
Yes, you can fix the LED light strip connector yourself. Ensure you have the right tools and follow proper safety procedures. It’s a simple process involving basic knowledge of electrical connections.
What Tools Do I Need To Fix Led Connectors?
To fix LED connectors, you will need a soldering iron, wire cutters, and heat shrink tubing. These tools will help you create a secure and lasting connection.
Are There Common Issues With Led Connectors?
Common issues with LED connectors include loose connections, corrosion, and bent pins. These problems can cause the LED strip to malfunction or not work at all.
Conclusion
Fixing a LED light strip connector is simple and manageable. Follow the steps carefully. Gather your tools and materials first. Then, ensure the connector and strip are clean. Align the connector pins with the strip. Secure them tightly to avoid loose connections.
Test the strip to ensure it works properly. A little patience and attention to detail will help. Now, your LED light strip should work perfectly. Enjoy the bright and vibrant lighting in your space.


