
If your ceiling fan light chain is broken or stuck, don’t worry. Fixing it is easier than you might think.
With a few simple steps, you can get your fan working smoothly again. Ceiling fan light chains can wear out over time. They may break, get stuck, or become difficult to pull. This can leave you in the dark, both literally and figuratively.
But there’s good news. You don’t need to be a professional to fix it. With some basic tools and a little patience, you can handle this common household issue. In this guide, we’ll walk you through each step. By the end, your ceiling fan light will be back in action, and you’ll feel accomplished. Let’s get started on fixing that chain!
Preparation Steps
Before diving into fixing the chain on your ceiling fan light, it’s crucial to prepare adequately. Proper preparation not only ensures a smooth repair process but also keeps you safe. Below are the essential preparation steps you need to follow.
Safety Measures
Safety should be your top priority. Follow these measures to avoid accidents:
- Turn off the power: Switch off the circuit breaker to the ceiling fan.
- Use a sturdy ladder: Ensure the ladder is stable and placed on a flat surface.
- Wear protective gear: Use safety goggles and gloves to protect yourself.
Required Tools
Having the right tools makes the job easier. Gather these tools before you start:
| Tool | Purpose |
|---|---|
| Phillips screwdriver | To remove and replace screws |
| Flathead screwdriver | To pry open fixtures |
| Wire cutters | To cut and strip wires |
| Replacement chain | To replace the broken chain |
| Voltage tester | To ensure power is off |
With these tools and safety measures in place, you are now ready to fix the chain on your ceiling fan light.
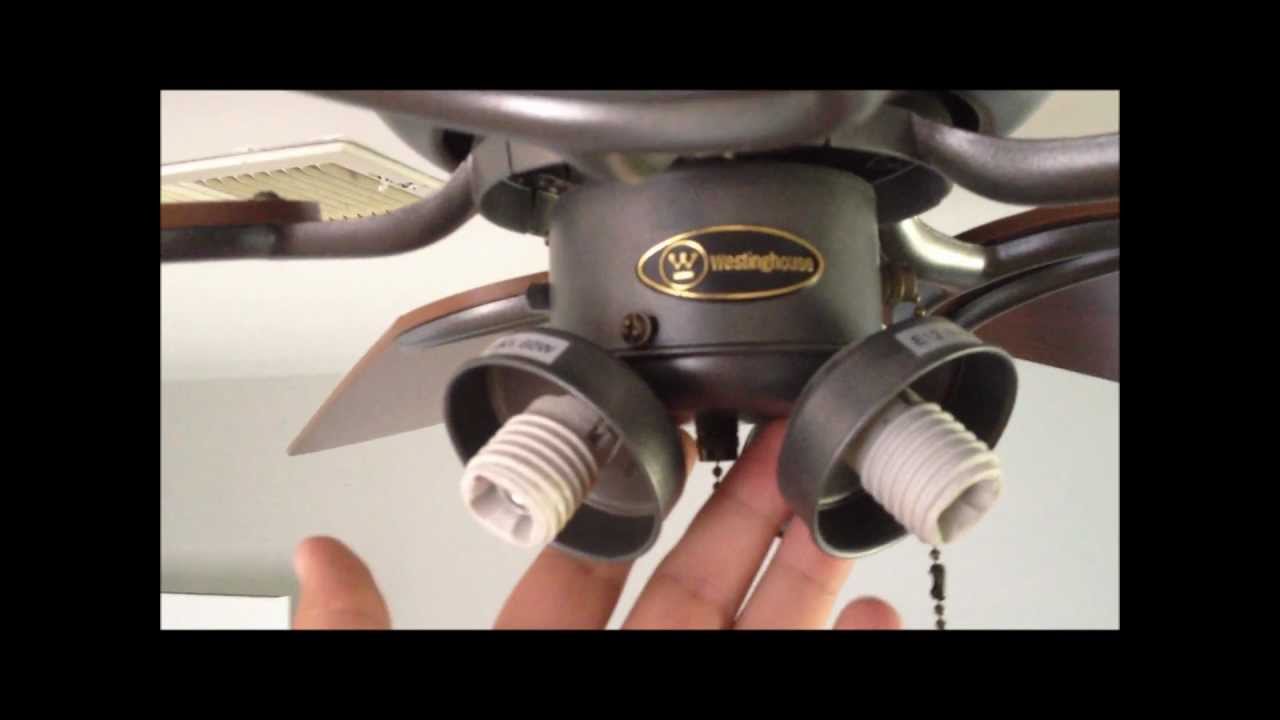
Credit: www.youtube.com
Turning Off Power
Turning off the power is a crucial first step. This ensures your safety while fixing the chain on your ceiling fan light. Working with electricity can be dangerous. So, always double-check that no power is running.
Locate Circuit Breaker
First, find your home’s circuit breaker box. Typically, it’s in the basement, garage, or utility room. Open the box and look for the switch labeled for the ceiling fan. Flip the switch to the “off” position. This cuts off the power to the fan and light.
Verify Power Is Off
Next, confirm the power is truly off. Use a voltage tester on the ceiling fan light. Touch the tester to the wires connecting to the light. The tester should not light up or beep. This means there’s no electricity flowing. Now, it’s safe to proceed with fixing the chain.
Removing Fan Light Cover
To fix the chain on your ceiling fan light, you need to remove the light cover first. This step is crucial for accessing the chain mechanism. It may sound simple, but doing it correctly ensures you don’t damage any parts.
Unscrew The Light Cover
Look for screws around the light cover. These screws hold the cover in place. Use a screwdriver to remove them. Turn each screw counterclockwise. Place the screws in a safe spot. You will need them later. If there are no visible screws, the cover might twist off. Gently twist the cover counterclockwise. It should come off easily.
Handle With Care
Be gentle while removing the cover. Ceiling fan light covers are often made of glass. They can break easily if mishandled. Hold the cover with both hands. Avoid applying too much pressure. Place the cover on a soft surface. This will prevent scratches or breaks.
:max_bytes(150000):strip_icc()/broken-fan-pull-chain-switch-4775179-hero-31f04775f34f41678f94d62e4bbfab77.jpg)
Credit: www.thespruce.com
Accessing The Chain Mechanism
Fixing the chain on a ceiling fan light may seem tricky. But with a few steps, you can do it yourself. First, you need to access the chain mechanism. This process requires some careful steps to ensure you don’t damage any parts. Follow these instructions to locate and inspect the chain mechanism of your ceiling fan light.
Locate Chain Attachment
Before you start, make sure the power is off. Turn off the power at the circuit breaker to avoid any electrical hazards. Once the power is off, get a sturdy ladder. Place it under the ceiling fan.
Next, look for the chain attachment. This is usually found near the base of the fan light. Gently pull the chain to see if it moves. If it does not, it might be stuck inside the fan housing.
Remove the light cover or globe carefully. Use a screwdriver to take out any screws holding the cover. Once removed, you should see the chain attachment point.
Inspect The Mechanism
With the light cover off, inspect the chain mechanism. Look for any signs of damage or wear. Check if the chain is tangled or broken. If the chain is tangled, gently untangle it. If the chain is broken, you may need to replace it.
Ensure the chain is properly connected to the switch inside the fan housing. Sometimes, the chain can come loose from the switch. Reattach it if necessary. Use pliers to secure any loose connections.
| Step | Description |
|---|---|
| 1 | Turn off the power at the circuit breaker. |
| 2 | Place a sturdy ladder under the fan. |
| 3 | Locate the chain attachment point. |
| 4 | Remove the light cover with a screwdriver. |
| 5 | Inspect the chain mechanism for damage. |
If you find any broken parts, replace them with new ones. Make sure to use parts compatible with your ceiling fan model. Tighten all screws and connections before replacing the light cover.
Replacing The Chain
Replacing the chain on a ceiling fan light can seem daunting. It is a simple task if broken down into steps. This guide will help you fix the chain and get your fan working again. Follow these steps for a quick and easy fix.
Detach Broken Chain
First, turn off the power to the fan. Safety is important. Use a ladder to reach the fan. Find the switch housing where the chain is. Use a screwdriver to open the housing. Look for the broken chain. Pull the broken piece out of the switch. Remove any remaining parts of the broken chain.
Attach New Chain
Get a new pull chain. It should be the same length as the old one. Insert the new chain into the switch hole. Connect it to the switch mechanism. Ensure it is secure. Put the switch housing back together. Tighten the screws. Test the chain. Turn the power back on. Pull the chain to ensure it works correctly.
Reassembling The Light Fixture
After repairing the chain on your ceiling fan light, it’s time to reassemble the light fixture. This process ensures everything is secure and in working order. Follow these steps to reattach the light cover and secure the screws.
Reattach Light Cover
First, locate the light cover that you previously removed. Align the cover with the fixture, ensuring it fits snugly. Gently push the cover into place, making sure it sits evenly around the edges.
Hold the cover steady with one hand. Use your other hand to guide it into the correct position. Double-check that the cover is secure before moving on to the next step.
Secure Screws
Next, gather the screws you removed earlier. Start by inserting them back into their original holes. Tighten each screw using a screwdriver, turning clockwise.
Make sure each screw is firmly in place. This prevents the cover from becoming loose. Avoid overtightening to prevent damage to the fixture.
After securing all screws, give the cover a gentle tug. This ensures it is properly fastened. If it feels loose, recheck and tighten the screws as needed.
Testing The Fan Light
After replacing the chain on your ceiling fan light, it’s crucial to test the light. This ensures that the repair was successful and the fan light functions as expected. Follow these steps to test the fan light effectively.
Restore Power
Turn the power back on at the circuit breaker. This is an essential step before testing the fan light. Ensure that the switch on the wall is also turned on. Check that the fan and light are receiving power.
Test Chain Operation
Pull the chain gently to test its operation. The light should turn on and off smoothly. If it doesn’t work, check the connections again. Make sure everything is securely in place. If the light flickers, there might be a loose connection. Tighten all connections and try again. Ensure the fan and light work together without any issues.
Credit: www.reddit.com
Troubleshooting Tips
Fixing the chain on your ceiling fan light can be tricky. Sometimes, the chain gets stuck or the light doesn’t work. These troubleshooting tips will help you solve the issue. Follow these steps to get your ceiling fan light working again.
Chain Still Stuck
If the chain is still stuck, check if it is tangled. Turn off the power to the fan. This is important for safety. Use a ladder to reach the fan.
First, gently pull the chain. If it doesn’t move, you might need to open the light fixture. Remove the light cover and look inside. Sometimes, the chain gets caught in the mechanism. Untangle the chain if you see any knots.
If the chain is broken, you will need a replacement. You can find replacement chains in hardware stores. Follow the instructions on the package to install the new chain.
Light Not Working
If the light is not working, check the bulb first. Ensure the bulb is not burnt out. Replace the bulb with a new one if needed.
If the bulb is fine, check the connections. Turn off the power to the fan. Open the light fixture and look at the wires. Ensure all wires are connected properly. Sometimes, a loose wire can cause the light to stop working. Tighten any loose wires you find.
If the wires are fine, the problem might be with the switch. Test the switch to see if it works. If the switch is faulty, replace it with a new one.
Frequently Asked Questions
How Do I Fix A Broken Ceiling Fan Chain?
First, turn off the power. Remove the fan housing. Locate the broken chain connector. Replace it with a new chain. Reassemble the housing.
Why Won’t My Ceiling Fan Light Turn On?
Check if the chain is broken or disconnected. If so, replace or reconnect it. Ensure the power is on.
Can I Replace The Ceiling Fan Chain Myself?
Yes, you can replace it yourself. Turn off the power first. Follow the manufacturer’s instructions carefully.
What Tools Do I Need To Fix A Fan Chain?
You’ll need a screwdriver, pliers, and a replacement chain. Ensure all tools are handy before starting the repair.
Conclusion
Fixing the chain on your ceiling fan light can be straightforward. Follow the steps outlined, and you’ll have it working again. Remember to turn off the power first. This ensures your safety. Use the right tools for the job. If unsure, ask for help.
Regular maintenance prevents future issues. Keep your fan running smoothly. Save time and money with these easy tips. Enjoy a well-lit, comfortable room once more. Your ceiling fan light will function like new. Happy fixing!


