To fix a pilot light on a gas fireplace, you need to check the gas supply, clean the pilot light opening, and relight the pilot following the manufacturer’s instructions. This process might seem tricky, but with the right steps, you can do it safely and efficiently.
Gas fireplaces are cozy and convenient. But when the pilot light goes out, it can be a hassle. Knowing how to fix it can save you time and stress. This guide will help you understand the steps to take when your pilot light stops working.
We’ll explain the common reasons for pilot light issues and how you can address them. Whether you’re a seasoned DIY enthusiast or just looking to save on service calls, this article will walk you through the process. Let’s get started on getting your fireplace back to warming your home.
Introduction To Pilot Lights
Gas fireplaces add warmth and ambiance to any home. They rely on a small, steady flame called a pilot light. This tiny flame is essential for the fireplace to function properly. Understanding how pilot lights work can help you troubleshoot common problems and keep your fireplace running smoothly.
Importance Of A Pilot Light
The pilot light is crucial for igniting the gas in your fireplace. It stays lit continuously, ensuring that you can start a fire quickly. Without a working pilot light, the fireplace will not ignite. This small flame acts as a safety feature, preventing gas leaks by burning off excess gas.
Common Issues With Pilot Lights
Pilot lights can face a few common issues. One of the main problems is that the flame goes out. This can happen due to a draft, dirt in the pilot tube, or a faulty thermocouple. Another issue is the pilot light not lighting at all. This may be caused by a clogged orifice or a malfunctioning gas valve.
Fixing these issues often involves cleaning parts or replacing faulty components. Knowing the common problems can help you diagnose and fix your pilot light, ensuring your gas fireplace works safely and efficiently.
Credit: airconditioningarizona.com
Safety Precautions
Before you start fixing the pilot light on your gas fireplace, it’s crucial to follow some safety precautions. This ensures you perform the task safely and effectively. Below, we will cover the necessary tools, ensuring the gas supply is off, and other safety tips.
Necessary Tools And Equipment
- Flashlight: To see the pilot light clearly.
- Adjustable Wrench: For tightening or loosening connections.
- Needle-nose Pliers: For handling small components.
- Multimeter: To check electrical connections.
- Cleaning Brush: To remove dust and debris.
- Manual: The user manual for your gas fireplace.
Ensuring Gas Supply Is Turned Off
Always turn off the gas supply before starting any repairs. This prevents gas leaks and potential hazards.
- Locate the gas valve near your fireplace.
- Turn the valve to the off position. This is usually a 90-degree turn.
- Double-check that the gas is off by trying to light the pilot. It should not ignite.
Ensuring the gas supply is off is the most crucial safety step. Never skip this part.
Accessing The Pilot Light
Fixing the pilot light on a gas fireplace can seem daunting. But with some clear steps, it becomes manageable. The first step involves accessing the pilot light. This process is straightforward if you follow the right directions. Here, we break it down into manageable steps.
Locating The Pilot Light
The pilot light is usually found behind the gas fireplace’s control panel. Start by looking at the base of your fireplace. Find the control knob, which is often labeled. Near this knob, you should see a small panel or cover. This cover hides the pilot light and other controls.
In some models, the pilot light may be at the back. Use a flashlight to help locate it if necessary. Always ensure the gas supply is off before proceeding. Safety first!
Removing The Fireplace Cover
Once you’ve located the pilot light, the next step is removing the fireplace cover. This cover protects the internal components of your fireplace.
Use a screwdriver to remove any screws holding the cover in place. Some covers may simply lift off. Be gentle to avoid damaging any parts.
After removing the cover, you’ll have direct access to the pilot light. This will allow you to inspect and clean it as needed. If there’s a lot of dust or debris, use a soft brush or cloth to clean the area. This can improve the pilot light’s functionality.
Cleaning The Pilot Light
A dirty pilot light can cause your gas fireplace to malfunction. Regular cleaning ensures your fireplace works efficiently. Dust and debris can block the pilot light, making it hard for the gas to ignite. Follow these steps to clean the pilot light and keep your fireplace in good condition.
Cleaning The Pilot Assembly
First, turn off the gas supply to the fireplace. This is important for safety. Next, locate the pilot assembly. It usually sits near the main burner. Use a screwdriver to remove the cover of the pilot assembly. Once removed, you will see the pilot light and the surrounding parts.
Carefully inspect the area for any visible dirt or debris. Use a soft brush to gently clean the pilot assembly. Make sure not to damage any parts. You can also use a can of compressed air to blow away any dust. This will help to ensure that the gas flow is not obstructed.
Removing Debris And Soot
Soot and debris can build up around the pilot light. They can cause the flame to be weak or irregular. To remove debris, take a small wire brush and gently scrub the pilot light. Be gentle to avoid damaging the small parts.
You can also use a vacuum cleaner with a hose attachment. This will help to suck up any loose particles. If there is stubborn soot, a bit of rubbing alcohol on a cloth can help. Rub gently and make sure the area is clean and dry before reassembling.
Once everything is clean, reassemble the pilot assembly and turn the gas back on. Light the pilot light to check if it burns strong and steady. If the flame is still weak, you may need to clean it again or seek professional help.
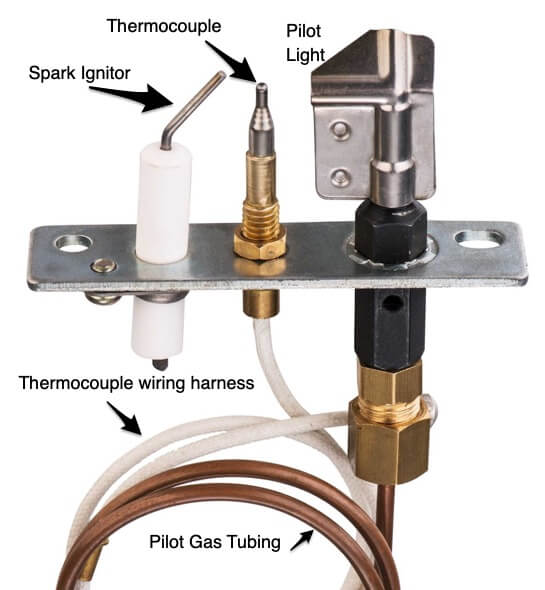
Inspecting The Thermocouple
Inspecting the thermocouple is crucial for fixing a pilot light on a gas fireplace. This small device senses the heat from the pilot light and signals the gas valve to stay open. Understanding how to identify and check for damage in the thermocouple can save time and money.
Identifying The Thermocouple
The thermocouple is usually located near the pilot light. It is a thin, metal tube and often has a copper color. Follow these steps to identify the thermocouple:
- Turn off the gas supply to the fireplace.
- Locate the pilot light assembly. This is where the thermocouple is attached.
- Look for a small, metal rod near the flame. This is the thermocouple.
Checking For Damage
Once you have identified the thermocouple, check for visible damage. Here are common signs of a damaged thermocouple:
- Corrosion or dirt: A dirty thermocouple cannot work properly. Clean it gently with a sandpaper or cloth.
- Bent or broken: A bent or broken thermocouple needs replacement.
- Loose connections: Ensure the thermocouple is securely attached to the gas valve and pilot assembly.
If you find any damage, the thermocouple likely needs replacing. A functional thermocouple is vital for keeping the pilot light lit.
Relighting The Pilot Light
Relighting the pilot light on a gas fireplace can seem daunting. But with the right steps, you can do it safely and easily. Let’s walk through the process.
Following Manufacturer Instructions
Always start by reading the manufacturer’s instructions. These guides provide specific steps for your model. They ensure you handle everything correctly. You can usually find these instructions in your fireplace’s manual. If you don’t have the manual, check the manufacturer’s website. Many companies offer downloadable versions online.
Using A Long Lighter
Using a long lighter is crucial for safety. It keeps your hand away from the flame. First, locate the pilot light assembly. It’s usually near the bottom of the fireplace. Turn the gas knob to the “Pilot” position. Press and hold the knob while lighting the pilot. Use the long lighter to ignite the gas. Once the pilot light is lit, keep holding the knob for 30 seconds. This allows the thermocouple to heat up. After 30 seconds, release the knob. The pilot light should stay lit. If it goes out, repeat the process.
Adjusting The Pilot Light Flame
Adjusting the pilot light flame is crucial for a gas fireplace. It ensures safe and efficient operation. A properly adjusted flame prevents issues and keeps the fireplace running smoothly. Follow these steps to set the correct flame height and ensure a steady flame.
Setting The Correct Flame Height
The flame should be blue with a small yellow tip. If it’s too high or too low, adjust it using the control knob. Turn the knob slowly to avoid abrupt changes. Check the flame height regularly for consistency. A correct flame height provides optimal performance.
Ensuring A Steady Flame
A steady flame indicates proper gas flow. If the flame flickers, check for drafts or blockages. Clear any obstructions around the pilot light. Ensure the gas supply is stable and uninterrupted. A steady flame ensures safe and efficient operation. Regular maintenance helps keep the flame steady.

Credit: www.youtube.com
Testing The Gas Fireplace
Testing the gas fireplace ensures it works safely. Follow these steps to test your fireplace. It is easy and quick. You will have warmth in no time.
Turning The Gas Supply On
First, locate the gas supply valve. It is usually near the fireplace. Turn the valve to the “on” position. You may hear a faint hiss. This sound means gas is flowing. If you smell gas, turn it off immediately. Ventilate the room and wait for the smell to clear.
Monitoring The Pilot Light
After turning on the gas supply, check the pilot light. Press the pilot light button. Hold it for 30 seconds. This allows gas to reach the pilot light. Release the button slowly. Look at the pilot light. It should stay lit. If it goes out, repeat the process.
If the pilot light still does not stay lit, there may be a problem. Check for blockages or dirt. Clean the pilot light area carefully. Try lighting it again. If it still does not work, contact a professional.
Troubleshooting Persistent Issues
Sometimes, fixing the pilot light on a gas fireplace can be tricky. Even after you follow the basic steps, issues might persist. This section will guide you through troubleshooting persistent issues with your gas fireplace pilot light.
When To Call A Professional
If the pilot light keeps going out, it might be time to call a professional. Gas leaks or faulty components are best handled by experts. Do not attempt to fix a gas leak yourself. Here are some signs you need professional help:
- Strong smell of gas
- Unusual noises from the fireplace
- Repeated failure to ignite
- Soot buildup or discoloration
Common Fixes For Recurring Problems
There are a few common problems that you can fix yourself. Below are steps to resolve them:
- Dirty Pilot Light: Dirt or debris can block the pilot light. Clean it using a brush and compressed air.
- Faulty Thermocouple: The thermocouple might need replacement. This part senses the pilot light and signals the gas valve.
- Gas Valve Issues: Ensure the gas valve is open. If it’s stuck, gently turn it to the open position.
- Air in Gas Line: Air bubbles can cause issues. Bleed the gas line to remove air.
| Problem | Solution |
|---|---|
| Dirty Pilot Light | Clean with a brush and compressed air |
| Faulty Thermocouple | Replace the thermocouple |
| Gas Valve Issues | Ensure the valve is open |
| Air in Gas Line | Bleed the gas line |
If these fixes do not work, you might need to consult a professional. Always prioritize safety when dealing with gas appliances.

Credit: www.youtube.com
Regular Maintenance Tips
Maintaining your gas fireplace ensures it works smoothly and safely. Regular checks and cleanings are essential. Below are some crucial maintenance tips to keep your fireplace in top condition.
Routine Cleaning Schedule
A clean fireplace is a safe fireplace. Follow this routine cleaning schedule:
- Weekly: Clean the glass doors to remove soot and dirt.
- Monthly: Dust the inside of the fireplace, including the logs and burner.
- Annually: Perform a deep clean. Check and clean the vent or chimney.
Use a soft cloth for cleaning glass and a vacuum for removing dust inside. Avoid using harsh chemicals.
Periodic Safety Checks
Safety checks are vital to prevent gas leaks and other hazards. Here are some important checks:
- Inspect the Pilot Light: Ensure it is steady and blue. A yellow or flickering light indicates a problem.
- Check for Gas Leaks: Use a gas detector or soapy water to inspect connections.
- Test the Thermostat: Confirm it is working correctly and maintaining the desired temperature.
Schedule professional inspections yearly to ensure all components are in good condition.
Frequently Asked Questions
Why Is My Gas Fireplace Pilot Light Not Staying Lit?
A dirty or misaligned thermocouple could be the cause. Ensure it is clean and properly aligned. If the problem persists, you may need to replace the thermocouple or consult a professional technician.
How Do I Relight My Gas Fireplace Pilot Light?
First, turn off the gas supply and wait a few minutes. Then, press the pilot light button while holding a lit match near the pilot opening until it lights.
What Tools Do I Need To Fix A Pilot Light?
You typically need a screwdriver, a wrench, and a lighter or matchstick. In some cases, a thermocouple replacement kit might be necessary.
Can I Fix The Pilot Light Myself?
Yes, you can fix minor issues yourself. However, for complex problems, it’s recommended to consult a professional technician to ensure safety and proper functioning.
Conclusion
Fixing a pilot light on a gas fireplace is doable. Follow the steps outlined. Always prioritize safety first. Turn off the gas before starting. Check for blockages and clean the pilot light. Re-lighting the pilot correctly is crucial. If problems persist, calling a professional is wise.
Keep your fireplace maintained regularly. It ensures a warm, cozy home. Enjoy the comfort your fireplace brings.


