
A cracked tail light can be a real hassle. It’s not just about aesthetics; it’s a safety issue too.
Driving with a damaged tail light can lead to accidents or even fines. Fixing it yourself can save you time and money. In this blog post, we will guide you through the process of fixing a cracked tail light. Whether you’re dealing with a minor crack or a more severe break, we’ll provide simple steps to get your tail light looking and functioning like new.
No need for expensive repairs or professional help. With a few tools and some patience, you can tackle this common car issue on your own. Let’s get started on making your vehicle safe and road-ready again!
Credit: carfromjapan.com
Tools And Materials Needed
Fixing a cracked tail light may seem daunting, but with the right tools and materials, you can easily tackle this repair yourself. Having everything ready before you start will save time and ensure a smooth process. Below, we’ll outline the essential tools and recommended materials required for this task.
Essential Tools
To efficiently fix a cracked tail light, you will need a few essential tools. These tools will help you complete the job safely and correctly.
- Screwdriver Set: Different tail lights use different types of screws. A set with various heads will be useful.
- Pliers: Useful for gripping and pulling out any broken pieces.
- Socket Wrench: Some tail lights are held in place with bolts rather than screws.
- Utility Knife: Handy for cutting away any damaged parts or old adhesive.
- Gloves: Protect your hands from sharp edges and broken glass.
Recommended Materials
In addition to tools, you will need specific materials to ensure a successful repair. Here’s a list of recommended materials:
| Material | Purpose |
|---|---|
| Replacement Tail Light | A new tail light to replace the cracked one. |
| Adhesive Sealant | Seals any gaps and ensures the tail light stays in place. |
| Cleaning Cloth | Used for cleaning the area before installation. |
| Alcohol Wipes | Removes any grease or debris for a clean surface. |
| Sandpaper | Smoothens any rough edges around the cracked area. |
Having these tools and materials on hand will make the repair process easier and more efficient. Ensure you gather all items before starting the fix.

Credit: www.youtube.com
Safety Precautions
Fixing a cracked tail light is a simple task. Yet, safety should always be your top priority. Before you start, take some safety precautions. These steps ensure you stay safe and complete the job without any mishaps.
Protective Gear
Wearing the right protective gear is crucial. This prevents injuries while working on your car. Here is a list of gear you should consider:
- Gloves: Protects your hands from cuts and scrapes.
- Safety glasses: Shields your eyes from debris and dust.
- Closed-toe shoes: Prevents foot injuries in case you drop tools.
These items are not just suggestions. They are essential for your safety. Always have them on before you begin working.
Safe Work Environment
A safe work environment is as important as protective gear. Ensure your workspace is well-lit. This helps you see clearly and avoid mistakes.
Keep your work area clean and organized. This prevents accidents caused by tripping over tools or other items. Here are some tips for setting up a safe workspace:
- Clear the area: Remove unnecessary items around your car.
- Use proper lighting: Ensure your workspace is brightly lit.
- Secure your vehicle: Make sure your car is on a flat surface.
By following these steps, you reduce the risk of accidents. You also make the job easier and more efficient.
Removing The Damaged Tail Light
Removing a damaged tail light might seem daunting, but it’s simpler than you think. With a few basic tools and a little patience, you can easily tackle this task. Follow these steps to ensure a smooth process. Let’s start by locating the screws and bolts, and then move on to properly disconnecting the wiring.
Locating Screws And Bolts
First, open the trunk or tailgate of your vehicle. Look around the edges of the tail light assembly. You should see screws or bolts holding the tail light in place. These fasteners are usually visible, but sometimes they may be hidden behind a plastic cover. If you don’t see them, check for any covers that might be concealing the screws or bolts.
Use a screwdriver or wrench to remove these fasteners. Keep them safe, as you’ll need them to install the new tail light. Once all screws and bolts are removed, gently wiggle the tail light assembly to loosen it. Be careful not to apply too much force, as this could cause additional damage.
Properly Disconnecting Wiring
After loosening the tail light assembly, locate the wiring connected to the back of the tail light. These wires power the lights and must be disconnected before removing the tail light completely. Gently pull on the wiring connectors to disconnect them. If they don’t come off easily, check for any clips or latches that need to be released first.
Once all wiring is disconnected, carefully pull the damaged tail light out of its housing. Keep the wiring connectors safe and avoid letting them fall back into the vehicle’s body. Now you are ready to replace the damaged tail light with a new one.
Preparing The Surface
Fixing a cracked tail light involves several key steps. One of the most important steps is preparing the surface. Proper preparation ensures the repair lasts longer and looks better. Let’s dive into the details.
Cleaning The Area
Start by cleaning the area around the crack. Use a soft cloth and some soapy water. Gently scrub to remove any dirt, dust, or grime. Rinse with clean water and dry the area with a clean towel. A clean surface ensures the repair material sticks properly.
Sanding Rough Edges
After cleaning, inspect the crack for rough edges. Use fine-grit sandpaper to smooth these edges. Sand gently in a circular motion. This helps the repair material bond better. Wipe away any sanding dust with a clean cloth. Now, the surface is ready for the next step in the repair process.
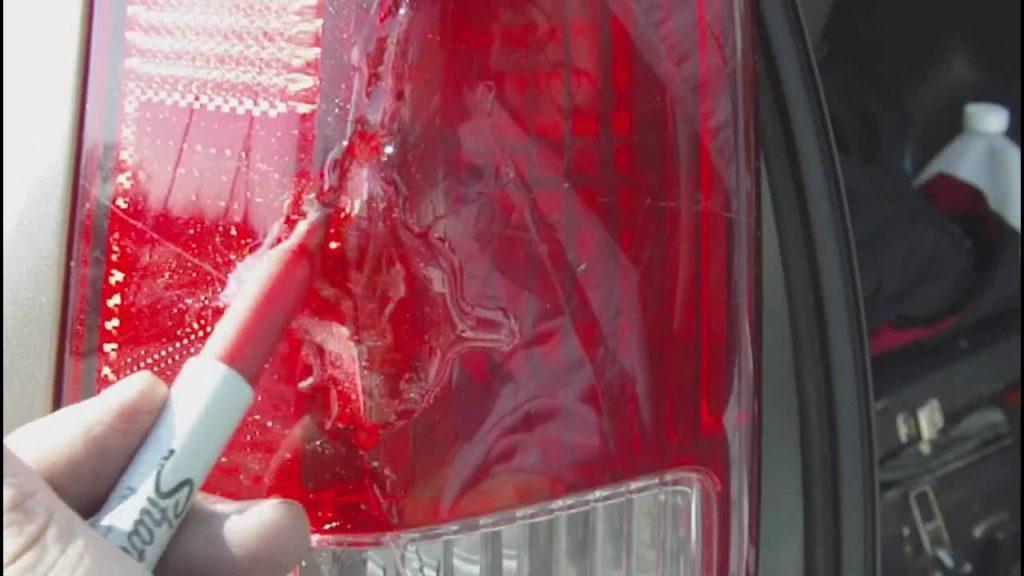
Applying The Repair Kit
A cracked tail light can be a safety hazard. Fixing it doesn’t have to be difficult. With the right repair kit, you can restore your tail light quickly. This section will guide you through the process.
Choosing The Right Kit
Finding the right repair kit is crucial. Look for a kit that suits your tail light material. Kits usually come with adhesive, filler, and instructions. Read reviews to ensure quality.
| Feature | Why It’s Important |
|---|---|
| Adhesive Quality | Ensures a strong bond |
| Filler Material | Matches tail light texture |
| Ease of Use | Simple instructions |
Step-by-step Application
- Clean the Area: Remove dirt and debris from the cracked area. Use a clean cloth and some rubbing alcohol.
- Apply Adhesive: Carefully apply the adhesive to the crack. Ensure it covers the entire crack.
- Fill the Crack: Use the filler provided in the kit. Fill the crack evenly and smoothly.
- Smooth the Surface: Use a small tool to smooth out the filler. This helps in creating an even finish.
- Let It Dry: Allow the repair to dry completely. Follow the drying time mentioned in the kit.
- Check the Repair: Inspect the repair area. Make sure it’s strong and blends well with the tail light.
Repairing a cracked tail light is simple with the right tools. Following these steps will help you achieve a professional-looking fix.
Reinstalling The Tail Light
Fixing a cracked tail light involves reinstalling the light back into its place. This step requires careful attention to detail. Ensuring the wiring is properly connected and screws are securely fastened is crucial.
Reconnecting Wiring
Start by reconnecting the wiring to the tail light. Ensure each wire matches its corresponding socket. A secure connection ensures the light functions correctly. Gently push the connectors until they click into place.
Securing Screws And Bolts
Next, focus on securing the screws and bolts. Align the tail light housing with the car’s body. Insert the screws and tighten them with a screwdriver. Avoid over-tightening as it may crack the housing. Ensure the tail light sits flush and secure.
Testing The Repair
Testing the repair of your cracked tail light is vital. You want to ensure it works perfectly. This step confirms your efforts were successful. It also ensures safety on the road. Follow these steps to test the repair properly.
Functionality Check
Turn on your car’s lights. Check if the tail light illuminates. Press the brake pedal. Ensure the brake light functions correctly. Test the turn signals. Make sure they blink as expected. Verify the reverse light. It should light up when the car is in reverse.
Ensuring Proper Alignment
Stand behind your car. Observe the repaired tail light. Ensure it aligns with the other tail light. Check for any gaps. The tail light should fit snugly. Look at the light beam pattern. It should be consistent and even. A misaligned light can confuse other drivers.
Maintenance Tips
Maintaining your tail light is crucial for road safety. Neglecting it can lead to fines or accidents. Regular maintenance keeps your vehicle in top shape and ensures you avoid unnecessary troubles. Here are some practical maintenance tips for your tail light.
Regular Inspections
Check your tail lights often. Regular inspections help catch problems early. Look for cracks, moisture, or dimming. These signs indicate that your tail light might need attention. Make it a habit to inspect your lights every few weeks.
Addressing Minor Issues Early
Fix small problems immediately. Minor cracks can grow and cause bigger issues. Use a clear adhesive to seal small cracks. This prevents water from entering and damaging the light. Early repairs save time and money in the long run.

Credit: www.rx7club.com
Frequently Asked Questions
How To Fix A Cracked Tail Light?
To fix a cracked tail light, clean the area, apply clear tape or epoxy, and let it dry. For permanent solutions, replace the damaged lens.
Can You Drive With A Cracked Tail Light?
Driving with a cracked tail light is unsafe and illegal in many places. It can lead to fines and accidents.
What Causes Tail Lights To Crack?
Tail lights can crack due to accidents, extreme temperatures, or debris impact. Regular maintenance can help prevent cracks.
How Much Does It Cost To Fix A Tail Light?
The cost to fix a tail light varies. A simple repair might cost around $20, while replacement could be $100 or more.
Conclusion
Fixing a cracked tail light is simpler than you think. Gather your tools and follow the steps carefully. Always ensure safety first. A well-maintained car keeps you safe on the road. Cracked tail lights can lead to fines or accidents.
Fixing them promptly saves time and money. Regularly check your tail lights for any damage. Stay proactive and keep your vehicle in top shape. This small effort can make a big difference. Happy and safe driving!


