Fixing a brake light might seem daunting, but it’s simpler than you think. It’s an essential skill for every car owner to know.
A malfunctioning brake light is not only a safety hazard but also a potential legal issue. Imagine driving in heavy traffic without a functioning brake light. It can lead to accidents or fines. Learning to fix it yourself can save you time and money.
Whether it’s a burnt-out bulb or a wiring problem, understanding the basics can make a huge difference. In this guide, we’ll walk you through the steps to diagnose and fix your brake light. By the end, you’ll feel confident handling this common car issue. Let’s get started and ensure your vehicle is safe on the road!
Tools And Materials
Fixing a brake light is an essential skill for every car owner. Proper tools and materials make the job easier and more efficient. This section will guide you through the essential tools and required materials for fixing a brake light.
Essential Tools
Having the right tools ensures a smooth repair process. Here are the essential tools you need:
- Screwdriver – A flathead or Phillips screwdriver is needed to remove screws.
- Socket Wrench – Use this to loosen and tighten nuts and bolts.
- Needle Nose Pliers – These help in reaching and handling small parts.
- Multimeter – This tool checks electrical connections and ensures they work.
- Flashlight – Provides better visibility, especially in dim areas.
Required Materials
In addition to tools, certain materials are necessary to complete the brake light fix:
- Replacement Bulb – Ensure it matches your car’s specifications.
- Electrical Tape – Used for securing and insulating electrical connections.
- Cleaning Cloth – Helps keep the work area clean and free from debris.
- Gloves – Protect your hands while working on the car.

Credit: www.autonationmobileservice.com
Safety Precautions
When fixing a brake light, safety should always be your top priority. Being cautious and taking the right safety measures can prevent accidents and injuries. Below, we will discuss the necessary safety precautions under two main aspects: Protective Gear and Work Environment.
Protective Gear
Wearing the right protective gear is essential for your safety. Start with a pair of durable gloves. These protect your hands from sharp objects and electrical components. Eye protection is also important. Safety glasses can shield your eyes from dust and debris.
Consider wearing long sleeves and pants. They protect your skin from accidental scrapes. Also, wear closed-toe shoes to protect your feet. A well-fitting pair will provide comfort and additional safety.
Work Environment
Creating a safe work environment is just as important. Make sure the car is on a flat surface. This prevents it from rolling. Use wheel chocks to secure the car in place. These small blocks can stop the wheels from moving.
Ensure the area is well-lit. Good lighting helps you see what you are doing. It reduces the risk of mistakes. Keep your tools organized and within reach. This saves time and prevents unnecessary movements.
Always disconnect the car battery before working on electrical parts. This prevents accidental shocks. Use a flashlight if needed. A clear view helps you work more safely.
Identify The Problem
Identifying the problem with your brake light is the first step to fixing it. A malfunctioning brake light can lead to accidents and fines. So, it’s important to address it quickly. Let’s start by inspecting the brake light and checking for common issues.
Brake Light Inspection
First, turn on your car and press the brake pedal. Ask a friend to check if the brake light comes on. You can also park your car near a wall and look for the brake light reflection. This will help you see if the light is working.
If the brake light does not come on, it might be a bulb issue. Check if the bulb is burned out. You can do this by removing the light cover. Look for any dark spots or broken filaments inside the bulb.
Common Issues
One common issue is a burned-out bulb. Replacing the bulb is often an easy fix. Another problem could be a blown fuse. Check the car’s fuse box and look for a blown fuse. Replace it if needed.
Sometimes, the brake light switch might be faulty. This switch is usually located near the brake pedal. If it’s broken, the brake light won’t work. Lastly, check for any loose or damaged wires. These can cause the brake light to malfunction.

Credit: m.youtube.com
Access The Brake Light
Fixing a brake light is an important task for vehicle safety. To fix it, you need to access the brake light first. This process involves locating the brake light and removing its cover or housing. Let’s dive into the steps.
Locate The Brake Light
First, identify where your brake lights are. They are usually at the back of the car. They might be on the trunk lid or the sides. Check your vehicle’s manual for exact locations.
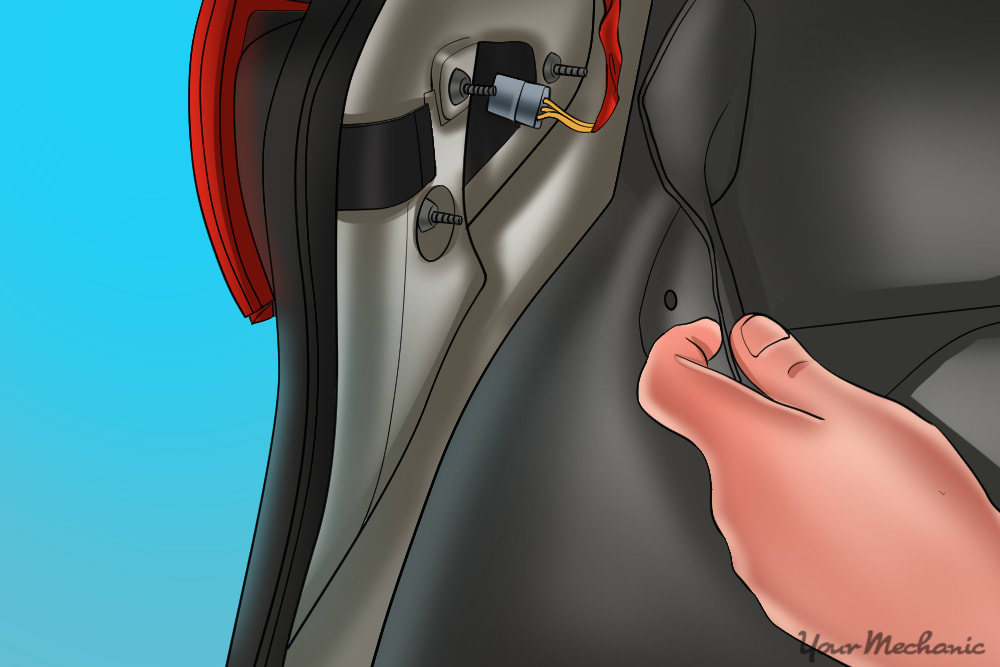
Remove Cover Or Housing
Once you find the brake light, you need to remove the cover. Some covers are held by screws, while others snap into place. Use a screwdriver or a similar tool to remove the screws if needed. For snap-on covers, gently pry them open using a flat tool.
| Cover Type | Tool Needed |
|---|---|
| Screw-on | Screwdriver |
| Snap-on | Flat Tool |
After removing the cover, you will see the bulb. Be careful not to damage any wires or connectors.
Remove The Old Bulb
Changing a brake light might seem like a task for a mechanic. But with the right steps, anyone can do it. First, you need to remove the old bulb. This process is simple and straightforward. Let’s break it down into manageable steps.
Disconnect Power
Before touching the brake light, disconnect the car battery. This prevents any electrical shock or short circuit. Locate the car battery in the engine bay. Use a wrench to loosen the negative terminal. Remove the cable and set it aside.
Take Out The Bulb
Now, access the brake light housing. Open the trunk or rear hatch to find the light cover. Unscrew the cover using a screwdriver. Some cars have clips that you need to unfasten. Once opened, locate the bulb holder. Twist it counterclockwise to release the bulb holder. Gently pull out the old bulb. Dispose of it properly to avoid any hazards.
Install The New Bulb
Replacing a brake light bulb is a simple task. It ensures your vehicle is safe and compliant. Follow these steps to install the new bulb effectively.
Choose The Right Bulb
Before installing, you need to choose the right bulb. Check your vehicle’s manual or the old bulb to find the correct type. Ensure it matches the specification.
| Car Model | Bulb Type |
|---|---|
| Toyota Camry | 1157 |
| Honda Accord | 7443 |
| Ford Focus | 3157 |
Insert The New Bulb
Once you have the correct bulb, it’s time to insert it. Follow these steps:
- Turn off the car and remove the keys.
- Access the brake light housing. This is usually in the trunk or rear panel.
- Remove the old bulb by twisting it counterclockwise.
- Insert the new bulb into the socket. Twist it clockwise until it is secure.
- Test the new bulb by pressing the brake pedal. Ensure it lights up properly.
Installing the new bulb is quick and easy. It ensures your brake lights work correctly. This keeps you and others on the road safe.
Test The New Brake Light
After installing the new brake light, the next step is testing it. Ensuring your brake light works properly is crucial for safety. Follow these simple steps to test the new brake light.
Reconnect Power
First, reconnect the power to the brake light. This usually means reattaching the battery cable. Make sure the connection is secure. Loose connections can cause the light to fail. Once reconnected, you can move to the next step.
Check Functionality
Press the brake pedal and have someone observe the brake light. The light should illuminate brightly. If it does not, check the bulb and connections again. Ensure everything is properly connected. If it still does not work, there may be an issue with the wiring. You might need professional help in that case.
Testing the new brake light is simple but important. It ensures your safety on the road. Always double-check your work to avoid any issues.
Credit: www.yourmechanic.com
Final Steps
You’ve successfully removed the old brake light bulb. Now, it’s time to complete the final steps. These steps ensure your brake light works properly and that your car is ready for the road again.
Reassemble Housing
Start by placing the new bulb into the socket. Make sure it fits snugly. Twist it gently to secure it in place. Next, reattach the housing cover.
Use the screws you removed earlier. Tighten them evenly. This ensures the housing is secure and won’t come loose.
Check for gaps around the edges. A well-sealed housing keeps water and dirt out, protecting your new bulb.
Dispose Of Old Bulb
Proper disposal of the old bulb is important. Many bulbs contain materials that can be harmful to the environment.
Place the old bulb in a small plastic bag. This prevents it from breaking and causing injury.
Take it to a local recycling center. Most centers accept old bulbs and dispose of them correctly.
| Step | Description |
|---|---|
| Reassemble Housing | Insert new bulb, reattach housing cover, and check for gaps. |
| Dispose of Old Bulb | Place old bulb in a plastic bag and take it to a recycling center. |
Frequently Asked Questions
How Do I Identify A Faulty Brake Light?
To identify a faulty brake light, turn on your car and have someone check the rear lights. If the brake light doesn’t illuminate when you press the brake pedal, it’s faulty.
What Tools Do I Need To Fix A Brake Light?
To fix a brake light, you typically need a screwdriver, a new brake light bulb, and possibly some gloves. These tools help you safely and effectively replace the faulty bulb.
Can I Fix A Brake Light Myself?
Yes, you can fix a brake light yourself. It’s a straightforward process involving removing the old bulb and installing a new one. Always consult your vehicle’s manual for specific instructions.
How Long Does It Take To Fix A Brake Light?
Fixing a brake light usually takes about 10-15 minutes. The process is quick and straightforward, especially with the right tools and a clear understanding of the steps involved.
Conclusion
Fixing a brake light is easier than you might think. Follow the steps, and you’ll save time and money. Always ensure your brake lights work properly for safety. Regular checks help avoid accidents and fines. Keep your tools handy for quick fixes.
Remember, a small effort can make a big difference. Stay safe on the road with functioning brake lights. Happy driving!


