
Fixing a license plate light is simple and important. It ensures your car stays legal and visible at night.
If your license plate light has gone out, don’t worry. This common issue is easy to address with a few tools and some basic knowledge. A functioning license plate light is crucial for road safety and to avoid fines. In this guide, we’ll walk you through the steps needed to replace or fix your license plate light.
Whether it’s a faulty bulb or a wiring issue, you’ll learn how to get it shining bright again. Stay with us to keep your vehicle safe and compliant on the road.
Tools And Materials
Before you start fixing your license plate light, gather the necessary tools and materials. Having the right items will make the job easier and faster. This guide will help you identify what you need.
Essential Tools
To fix the license plate light, you need a few basic tools. First, grab a flathead screwdriver. This will help you remove the light cover. Next, get a Phillips head screwdriver. This tool is crucial for dealing with screws. You will also need a pair of pliers. These will help you grip and turn small parts.
In addition, have a voltage tester on hand. This tool checks if the light socket has power. Lastly, use a clean cloth. This will keep your hands and work area clean.
Recommended Materials
Now, let’s talk about the materials. You will need a new bulb. Make sure it matches the old one. Bring an extra bulb just in case. You also need electrical tape. This will help secure any loose wires.
Having a can of WD-40 is useful too. It helps loosen rusted screws. Finally, keep a small container nearby. Use it to hold screws and tiny parts. This prevents losing them during the repair.

Credit: www.wikihow.com
Safety Precautions
Ensuring your license plate light is functioning properly is vital for safety. Before you start, follow these safety precautions to avoid any harm. This guide will help you prepare for fixing the light safely and effectively.
Safety Gear
- Wear gloves: Protect your hands from cuts or burns.
- Safety glasses: Shield your eyes from debris or sparks.
- Closed-toe shoes: Prevent injuries to your feet.
Workspace Preparation
Set up a clean and organized workspace. This will help you work efficiently and reduce the risk of accidents.
- Flat surface: Work on a stable, flat area.
- Good lighting: Ensure you have enough light to see clearly.
- Tool organization: Keep your tools within reach and organized.
| Item | Purpose |
|---|---|
| Gloves | Protect hands |
| Safety glasses | Protect eyes |
| Closed-toe shoes | Protect feet |
| Flat surface | Stable working area |
| Good lighting | Clear visibility |
| Tool organization | Efficient workflow |
By following these safety precautions, you will create a safe environment for fixing the license plate light. This will minimize the risk of injury and ensure a successful repair.
Accessing The License Plate Light
Accessing the license plate light is a simple task that ensures your vehicle remains road legal. This light is crucial for visibility at night. You can complete this task with basic tools in a short amount of time.
Locating The Light
First, find the light at the rear of your vehicle. It’s usually above or beside the license plate. Check your car manual if you’re unsure. The manual has diagrams that can help.
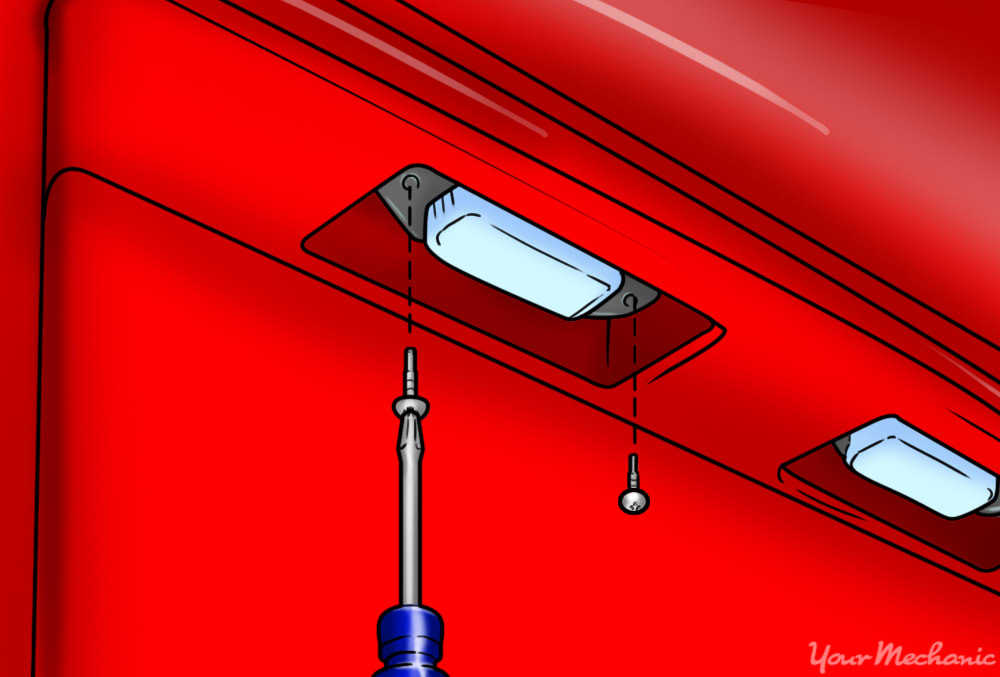
Removing The Cover
Once you locate the light, it’s time to remove the cover. Use a screwdriver to undo the screws holding the cover. Be careful not to lose the screws. Some covers may snap off without screws. Gently pry the cover off if it snaps on.
After removing the cover, you can access the bulb. Check the bulb for any damage or dirt. Replace the bulb if it’s burnt out. Clean the cover before reassembling everything. This ensures maximum light output.
Removing The Old Bulb
Fixing a license plate light might seem intimidating. But with the right steps, it’s quite simple. The first step in this process is removing the old bulb. This is crucial. Let’s break it down step-by-step to ensure you do it correctly.
Disconnecting The Power
Before you start, ensure your safety. Disconnect the car battery. This prevents any electrical shock. Locate the battery under the hood. Use a wrench to loosen the negative terminal. Remove it to cut off power. This step ensures your safety while working.
Extracting The Bulb
Next, locate the license plate light assembly. It’s usually above the license plate. Use a screwdriver to remove any screws. Gently pull out the light assembly. Be careful not to break it. Twist the bulb holder counterclockwise to release it. Now, you can see the old bulb. Carefully pull it out. If it’s stuck, wiggle it gently. Now, the old bulb is removed. You’re ready to install the new one.
Installing The New Bulb
Replacing your license plate light is a simple task. It ensures your vehicle remains visible. This section will guide you through installing the new bulb.
Choosing The Right Bulb
First, you need to select the correct bulb. Check your car’s manual for the bulb type. Common types include 168, 194, and 2825.
| Bulb Type | Brightness | Durability |
|---|---|---|
| 168 | Low | Medium |
| 194 | Medium | High |
| 2825 | High | Very High |
Choose a bulb that fits your needs. Brightness and durability matter.
Fitting The New Bulb
Once you have the right bulb, follow these steps to fit it:
- Turn off your car and remove the keys.
- Use a screwdriver to open the light cover.
- Gently pull out the old bulb.
- Insert the new bulb into the socket.
- Secure the light cover back in place.
Ensure the bulb is secure. You do not want it to fall out.
Turn on your car and check the new light. Make sure it works properly.
These steps ensure your license plate light is bright and safe.

Credit: www.youtube.com
Testing The New Light
Testing the new license plate light is crucial. This ensures it’s installed correctly and functions well. Once installed, you need to check the light to ensure it works properly. This step guarantees your vehicle remains visible and safe during night drives.
Reconnecting The Power
Begin by reconnecting the power to the license plate light. Ensure all wires are securely connected. Turn on your vehicle’s lights. This will power the new light. Check for any loose connections. Tighten if necessary. This step is important for proper functionality.
Checking Functionality
Once power is restored, check the new light. Ensure it illuminates correctly. Walk around your vehicle. Observe the light from different angles. It should shine brightly and evenly. Make sure there are no flickers. The light should remain steady.
If the light isn’t working, recheck your connections. Ensure everything is tight. If still not working, the light might be faulty. Consider replacing it. A properly working light is essential for safety.
Reassembling And Final Steps
After replacing your license plate light, you need to reassemble the parts. This step ensures everything is in place and working correctly. Paying attention to detail here guarantees the light will function properly for a long time.
Securing The Cover
Start by placing the cover back over the light. Make sure it fits snugly. Use the screws you removed earlier to secure it. Tighten each screw firmly, but don’t overtighten. This prevents damage to the cover or the light.
Check that the cover is properly aligned. An uneven cover can let water in, causing issues later. If the cover is not fitting right, adjust it before tightening the screws completely.
Final Inspection
After securing the cover, turn on your car’s lights. Check the license plate light to ensure it works. If the light doesn’t turn on, recheck the bulb installation. Sometimes, the bulb may not be seated correctly.
Once the light is working, check for any loose parts. Give the cover a gentle wiggle to ensure it is secure. If everything looks good, you are done!
Credit: www.yourmechanic.com
Troubleshooting Tips
Fixing your license plate light can be easy. Follow these troubleshooting tips to resolve the problem quickly. This guide will help you identify and fix common issues.
Persistent Issues
If your license plate light keeps failing, check these common issues:
- Burnt-Out Bulb: Replace the bulb if it’s burnt out.
- Loose Connections: Ensure all connections are tight and secure.
- Corroded Sockets: Clean any corrosion from the sockets.
- Blown Fuse: Check the fuse box and replace any blown fuses.
Use a multimeter to test for power. If the circuit lacks power, investigate the wiring further.
When To Seek Professional Help
Sometimes, fixing the issue yourself isn’t possible. Seek professional help in these cases:
- Complex Wiring Issues: When wiring problems are beyond basic repairs.
- Repeated Failures: If the light keeps failing despite your efforts.
- Electrical System Problems: When other lights or electrical components fail too.
Don’t risk causing further damage. A professional mechanic has the tools and expertise to diagnose and fix the problem correctly.
Frequently Asked Questions
How Do I Know If My License Plate Light Is Out?
Check your license plate light by turning on your vehicle’s lights. If it doesn’t illuminate, it’s out.
What Tools Do I Need To Fix License Plate Light?
You typically need a screwdriver and a replacement bulb. Some vehicles may require additional tools.
Can I Fix License Plate Light Myself?
Yes, fixing a license plate light is simple. Follow your vehicle’s manual for specific instructions.
How Often Should I Check My License Plate Light?
Check your license plate light regularly, at least once a month, to ensure it works properly.
Conclusion
Fixing a license plate light is simple and important for safety. First, gather your tools. Next, follow the steps outlined to replace the bulb. Always check the new light works before driving. Regular maintenance prevents future issues. Stay safe and visible on the road with a working light.
Now you have the know-how to keep your car in top shape.


