
Fluorescent light fixtures are common in homes and offices. They provide bright light but can sometimes need fixing.
Fixing a fluorescent light fixture might seem daunting, but it’s often straightforward. Many issues are due to simple problems, such as a burnt-out bulb or a faulty starter. By learning some basic steps, you can save time and avoid unnecessary costs.
This blog will guide you through the common issues and solutions for fluorescent light fixtures. Whether it’s flickering lights, dimming, or complete failure, you’ll find practical tips to get your lights working again. Let’s dive into the world of fluorescent lights and make your space bright once more!
Credit: www.younghouselove.com
Tools And Materials
Fixing a fluorescent light fixture can seem daunting. But with the right tools and materials, it’s manageable. Let’s walk through the essential tools and required materials needed for the job.
Essential Tools
Before starting, gather all necessary tools. A screwdriver is crucial. It helps open the fixture. A voltage tester ensures the power is off. Pliers are useful for handling wires. A wire stripper helps in stripping wire insulation. A step ladder provides safe reach to the fixture. Lastly, a flashlight helps you see clearly.
Required Materials
Certain materials are required too. New fluorescent tubes are essential. Ensure they fit your fixture. Ballasts may need replacement if faulty. Wire nuts secure wire connections. Electrical tape insulates exposed wires. Finally, keep extra screws handy. They help in securing the fixture.
Credit: www.younghouselove.com
Diagnosing The Problem
Fixing fluorescent light fixtures can seem daunting, but identifying the problem is the first step. Proper diagnosis can save you time and money. Let’s explore some common issues and how to perform initial checks to figure out what’s wrong with your light fixture.
Common Issues
Fluorescent light fixtures can have several common issues. Flickering lights are a frequent problem. This can be annoying and a sign of a bigger issue. Another common issue is a light that won’t turn on at all. Buzzing noises can also indicate a problem. Dim lights or lights that turn off unexpectedly are other signs of trouble.
Initial Checks
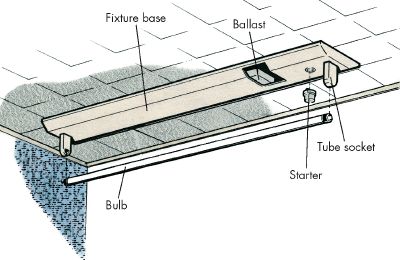
Start with some initial checks to diagnose the problem. First, check if the light tube is securely in place. Loose tubes can cause flickering or dim lights. Next, examine the tube for dark spots or burn marks. These signs indicate the tube may need replacement. Ensure the fixture is receiving power. Check the switch and circuit breaker. Also, inspect the ballast, which regulates current to the tubes. A faulty ballast can cause many issues.
Preparing For The Fix
Before starting the repair, you need to prepare. This step is very important. It ensures safety and makes the job easier. Let’s go through the key steps in this process.
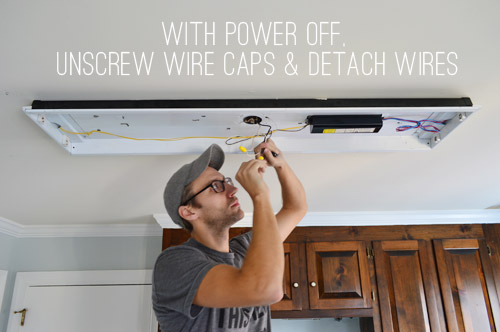
Power Shut-off
First, you must turn off the power. This is a crucial safety step. Electricity can be dangerous. Follow these steps to shut off the power:
- Go to the circuit breaker box.
- Find the switch that controls the light fixture.
- Turn the switch to the “off” position.
Use a voltage tester to check the wires. Make sure there is no power. This ensures you can work safely.
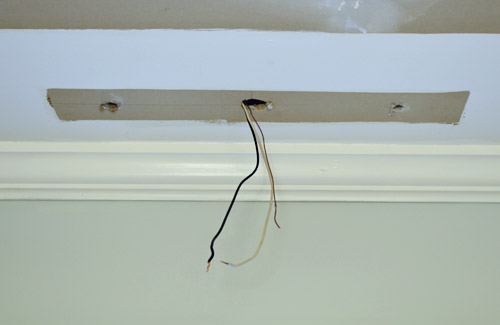
Fixture Disassembly
Next, you need to disassemble the fixture. Follow these steps:
- Remove the light cover. Most covers are held by clips or screws.
- Take out the fluorescent tubes. Be careful, as they can be fragile.
- Unscrew the fixture from the ceiling or wall.
- Disconnect the wires. Take note of which wire connects to which.
Place all the small parts in a safe spot. You will need them later. A small table or tray works well for this.
Label the wires if necessary. This helps you remember where each one goes.
Replacing The Bulbs
Fluorescent light fixtures are common in many homes and offices. Over time, the bulbs can wear out and need replacement. This task is simple and can be done by anyone. Follow these easy steps to replace the bulbs in your fluorescent light fixture.
Removing Old Bulbs
First, make sure to turn off the power. This ensures your safety. Next, remove the light cover. Some covers clip on, while others slide off. Check your fixture’s design. Once the cover is off, locate the old bulbs. Gently twist each bulb. It will come loose from the socket. Carefully pull the bulb out.
Installing New Bulbs
Take your new fluorescent bulb. Align the prongs with the socket. Gently push the bulb in. Twist it until it locks in place. Repeat this for each bulb. Once all bulbs are in, replace the light cover. Turn the power back on. Your fixture should now work with bright, new light.
Replacing The Ballast
Replacing the ballast in a fluorescent light fixture ensures proper lighting and reduces flickering. This straightforward process can improve the efficiency and lifespan of your lights.
Replacing the ballast in a fluorescent light fixture can seem daunting. With clear steps, it becomes a simple task. This guide will walk you through identifying, removing, and installing the ballast.Identifying The Ballast
First, ensure the power is off. Safety is key. Next, remove the cover from the fixture. This usually involves unscrewing a few screws. Look for a rectangular or cylindrical component. This is the ballast. It will be connected to wires and mounted inside the fixture.Ballast Removal
Once identified, remove the ballast cover. This might involve prying it open gently. Note the wire connections. They are color-coded. Cut the wires close to the ballast. Leave enough wire to connect the new ballast. Unscrew the ballast from its mounting.Ballast Installation
Install the new ballast by securing it in the mounting spot. Connect the wires to the corresponding colors. Use wire nuts to ensure a secure connection. Replace the ballast cover. Reattach the fixture cover. Restore power and test the light. If it turns on, the ballast replacement was successful.Reassembling The Fixture
Reassembling the fluorescent light fixture is a crucial part of the process. This step ensures that the light works safely and efficiently. Following the proper steps will help you achieve this.
Securing The Parts
First, gather all the parts you removed earlier. Check to make sure nothing is broken. Place each part back into the fixture carefully.
Use the screws or clips that came with the fixture to secure each part. Tighten them firmly but do not over-tighten. Over-tightening can damage the parts.
Ensure the ballast and the starter are in the correct positions. This helps the light to function correctly.
Ensuring Proper Fit
Make sure all parts fit properly. They should not be loose or misaligned. Double-check each component to confirm it is secure.
Insert the fluorescent tube into the holder. It should click into place without much force. If it does not fit easily, check the alignment again.
Close the cover or diffuser if your fixture has one. This protects the tube and helps to diffuse the light evenly.
By following these steps, you can ensure your fluorescent light fixture is reassembled correctly. This will provide you with reliable and efficient lighting.
Testing The Fixture
After replacing the components of a fluorescent light fixture, the next step is testing the fixture. This ensures all parts are working correctly and the light operates as expected. Follow these steps to restore power and check the functionality.
Power Restoration
First, ensure the power is off before starting. This is important for safety.
Use a voltage tester to check if the power is off. If the tester shows no voltage, it is safe to proceed. Restore power to the fixture at the breaker box. Turn the switch on and observe if the light comes on.
Functionality Check
Once the power is restored, do a functionality check on the fixture. Look for the following indicators:
- Light turns on without flickering
- No humming or buzzing sounds
- Consistent brightness
If any issues are present, you may need to inspect the components again. Ensure all connections are secure and the bulbs are properly seated.
Sometimes, the problem might be with the ballast. If needed, use a multimeter to check the ballast’s output.
If the fixture still does not work, consider consulting a professional. They can provide further insights and solutions.
Maintenance Tips
Maintaining fluorescent light fixtures ensures they last longer and work efficiently. Regular upkeep can prevent common issues and save on energy costs. Let’s dive into some essential maintenance tips for keeping your fluorescent lights in top condition.
Regular Inspections
Inspect your fluorescent light fixtures every few months. Look for signs of wear and tear. Check for flickering lights, which might indicate a failing ballast. Examine the tubes for blackened ends. This could mean they are nearing the end of their life.
Ensure all connections are secure. Loose connections can cause lights to malfunction. Regular inspections can help spot issues early. This can prevent costly repairs later.
Cleaning Advice
Keep your fluorescent light fixtures clean. Dust and dirt can reduce their efficiency. Use a soft cloth to wipe down the tubes. Avoid using harsh chemicals. They can damage the fixtures.
If the fixture has a cover, clean it with mild soap and water. Rinse and dry it thoroughly before reassembling. Regular cleaning can improve light output. It also extends the life of your fixtures.
Credit: home.howstuffworks.com
Frequently Asked Questions
How Do I Fix A Flickering Fluorescent Light?
A flickering fluorescent light can often be fixed by replacing the starter or the ballast. Ensure the tube is securely in place. Sometimes, simply cleaning the fixture can help.
Why Won’t My Fluorescent Light Turn On?
If your fluorescent light won’t turn on, check the tube, starter, and ballast. Ensure all connections are secure. Replacing faulty components usually resolves the issue.
What Tools Do I Need To Fix A Fluorescent Light?
To fix a fluorescent light, you’ll need a screwdriver, pliers, and possibly a replacement starter or ballast. Always ensure power is off before starting.
Can I Fix A Fluorescent Light Myself?
Yes, you can fix a fluorescent light yourself. Follow safety precautions and identify faulty components. Replacing them usually solves common issues.
Conclusion
Fixing fluorescent light fixtures can seem challenging, but it’s doable. Follow the steps carefully. Always ensure safety first. Double-check connections and use the right tools. Regular maintenance helps avoid future issues. Save time and money by learning these basic repairs.
Enjoy a well-lit space without the hassle. Happy fixing!


